Description
Easy, dense and fudgy brownies for true chocolate lovers! Topped with cream cheese frosting for an extra delicious twist!
Ingredients
Brownie Ingredients:
1/2 cup strong brewed coffee
1/2 cup butter, melted and slightly cooled
1 teaspoon vanilla extract
2 eggs, beaten
3/4 cup all-purpose flour
3/4 cup sugar
2/3 cup cocoa
1/4 teaspoon salt
1/3 cup semi-sweet chocolate chips
Frosting Ingredients:
8 ounces cream cheese, softened
1/2 cup butter, softened
2-3 cups powdered sugar
1 teaspoon vanilla
Instructions
Brownie Directions:
Preheat the oven to 350 degrees f, and grease an 8×8 baking dish. Set aside.
Combine the coffee, butter, vanilla and eggs in a large mixing bowl. Add the sugar, mixing until just combined. Add the cocoa and salt, give it a quick stir, and then stir in the flour until no flour shows anymore. Stir in the chocolate chips.
Spread batter evenly into the greased baking dish. Bake for 25-30 minutes, or until a toothpick comes out with moist crumbs. Cut into squares, or use a festive cookie cutter and snack on the scraps (waste not, right?).
Frosting Directions:
In the bowl of a stand mixer fitted with the paddle attachment, beat together the cream cheese and butter until light and fluffy. Add two cups of powdered sugar and vanilla, increasing speed to high for 2-3 minutes once all the sugar is incorporated. Add more powdered sugar if the frosting is too soft to hold a peak.
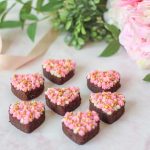
For the coloring, I used Americolor Deep Pink gel color in varying amounts for the different shades of pink.
Notes
I always use gel colors instead of liquid food coloring, because you don’t need to worry about messing up frosting consistency. If you haven’t used gel before, I recommend putting the color onto a toothpick, not directly into the bowl. That’s because gel coloring is really strong, and I’ve messed up by adding wayyyy too much. It’s easy to do!
To achieve this festive Valentine’s Day look, I used three different Wilton decorating tips. The first tip which made the light pink, larger flowers was Tip No. 224. The star tip that made the brighter pink stars was Tip No. 18, and the cream circles was Tip No. 5. I have this decorating piping tip kit, which I love! It has all the basics and I love the storage case. Plus it’s way more cost effective to buy the kit rather than individual tips.