
Valentine’s Day is officially around the corner, and I’ve got the perfect dessert for you! When I think of a Valentine’s Day dessert, chocolate definitely comes to mind. But this year I wanted to try something new. The almond and raspberry flavor combo is a classic, and doesn’t disappoint! These would also be a perfect dessert for a bridal shower, brunch or Mother’s Day!
For the frosting I used Chambord, which is a black raspberry liqueur. You can totally just use raspberry extract, except that I PROMISE you will love Chambord! It’s awesome for baking, mixing into cocktails, and I even drink it on its own like a port. Plus who doesn’t love a boozy cupcake!
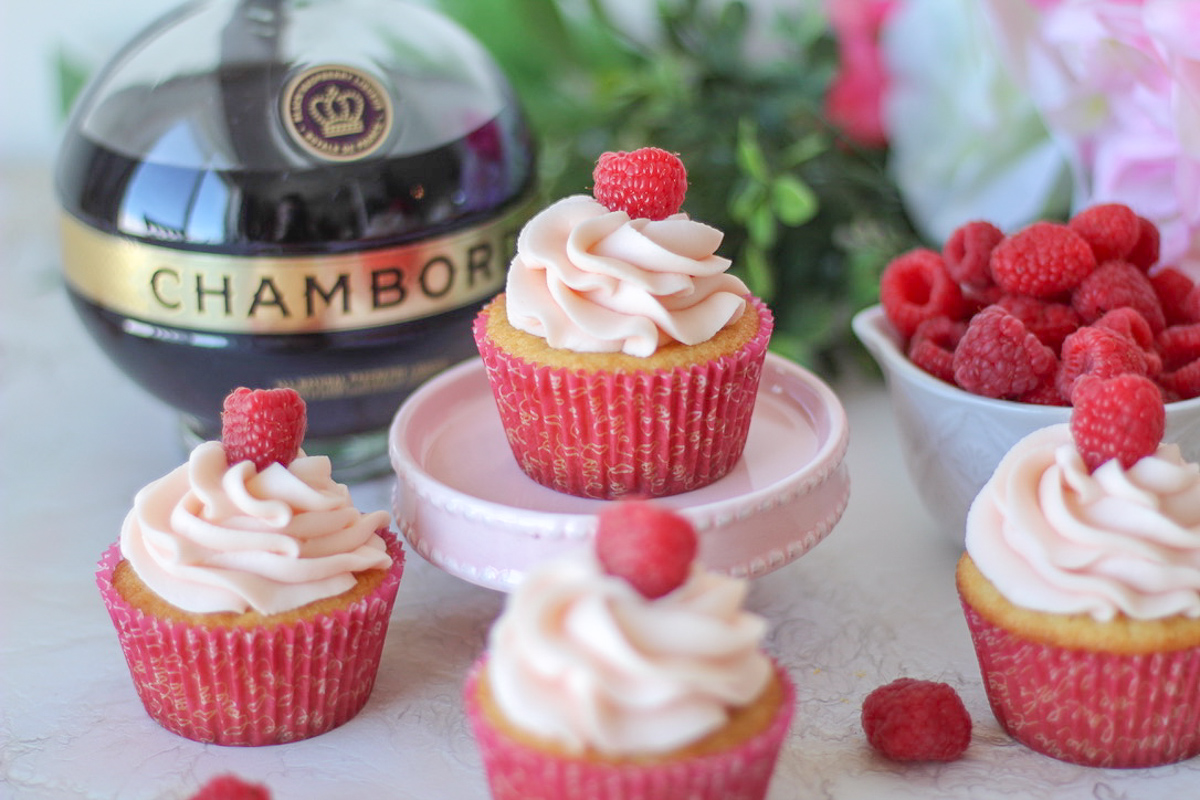


Makes 12 standard size cupcakes
Almond Cupcakes
- 1 1/2 cups all-purpose flour
- 1/2 tsp baking powder
- 1/2 tsp baking soda
- 1/2 tsp salt
- 3/4 cup sugar
- 1 cup butter (two sticks)
- 1 (7 oz) package almond paste
- 2 eggs
- 1 tsp almond extract
- 1/2 cup buttermilk
Chambord Frosting
- 2 (8 oz) packages of cream cheese, softened
- 1 stick butter, softened
- 3-4 cups powdered sugar, depending on desired consistency
- 2 Tbs Chambord
- 1 tsp raspberry extract
- 1 small drop red food coloring if you want pink frosting
Cupcake Directions:
Preheat the oven to 350, and line a muffin tin with liners (I prefer foil lined baking cups, because their colors stay vibrant after baking).
In a medium bowl, whisk together the flour, baking powder, baking soda and salt. Set aside.
Using a hand mixer, mix together the sugar, butter and almond paste until fluffy. Mix in the eggs one at a time, and then add the almond extract.
Add about a third of the flour mixture, and mix until just combined. Then add about a third of the buttermilk. Continue alternating between the flour and the buttermilk until both are mixed in. Adding all the buttermilk at once will cause the batter to separate, and adding all the flour mixture at once will make the cupcakes tough.
Spoon the batter into the lined muffin tin, filling each liner about 2/3 full. Bake at 350 degrees F for 12-15 minutes or until a toothpick comes out with just a few crumbs.
Frosting Directions:
Using a hand or stand mixer with the whisk attachment, cream together the cream cheese and butter. Add three cups of powdered sugar, a little at a time. Add the Chambord and raspberry extract, and mix until combined.
At this point you can decide if more powdered sugar is needed. If the frosting looks too liquid, and doesn’t hold a peak, Add more powdered sugar in 1/2 cup increments. The wonderful thing about frosting is that you can also taste it as you go, and adjust accordingly.
Frost your completely cooled cupcakes, and you’re done! I used my Wilton 1M tip, and fresh raspberries for garnish.
Enjoy!

The other day I was getting ready to experiment with some oatmeal chocolate chip cookies, and then decided why not make oatmeal muffins instead? This recipe took me three tries to get right. The first batch was fine, but a little dry (and even a little is too much), and the second batch I way over-corrected and they were too buttery (yes it’s possible!). Finally, with every bowl, spatula and measuring cup dirty, I got it right!
The buttermilk in these muffins helps soften the oatmeal so that it’s incorporated into the muffins, and the espresso helps give them more depth of flavor, especially to balance the chocolate chips!
- 1 cup old-fashioned rolled oats
- 1 1/4 cup buttermilk
- 1 large egg, beaten
- 1/4 cup packed brown sugar
- 1/2 cup salted butter, melted (one stick) plus 1 tablespoon
- 1 cup all-purpose flour
- 1 teaspoon salt
- 1 teaspoon baking powder
- 1/2 teaspoon baking soda
- 1/4 cup chopped pecans
- 1/3 cup semi-sweet chocolate chips
- 1 tablespoon granulated sugar
Directions:
In a large bowl, combine the rolled oats and buttermilk, making sure all the oats are covered by the milk. Let sit for one hour.
While the oats and buttermilk soak, whisk together the flour, salt, baking powder and baking soda. Set aside.
Preheat the oven to 400 degrees, and prepare a 12-cup muffin tin with wrappers. Alternatively you can butter the pan if you’d prefer.
Add the egg, 1/2 cup butter and brown sugar to the oats mixture and stir until just combined.
Stir the flour mixture into the oats mixture, and fold together until all ingredients are just combined. Fold in the pecans and chocolate chips.
Spoon the batter into the muffin tin cups. I used a cookie dough scoop to make it faster and easier.
Melt the remaining 1 tablespoon of butter, and brush over the muffins. Immediately after, sprinkle the granulated sugar over the muffins.
Bake for about 15 minutes, or until a toothpick comes out with just a few crumbs.
Enjoy!
This post contains affiliate links, which means if you follow a link and purchase the item, I may receive a small commission. I promise that any money earned will be used to produce future posts!

This past week it snowed for the first time this winter. I have to admit that I wasn’t super stoked about it, because it makes driving so much more stressful. What totally made up for that though was the fact that it was Charlotte’s first time seeing snow!
Obviously this will be much more exciting in future years when she can actually play in it. I’m already taking notes of the best sledding hills in the area!

It’s so interesting to watch Charlotte observe the world around her. You can really see the wheels turning as she takes everything in, and that was definitely the case with snow! She especially seemed to enjoy the contrast of the white snow on the dark green trees.

Snowy and cold weather also calls for warming drinks! I’m partial to hot cocoa myself (especially with a dash of Baileys!), but my husband Jordan enjoys hot mulled wine.

Every year my parents host a fun party where they serve mulled wine, and I’ve shared the recipe below. We originally got the recipe after hearing about it on NPR, and NPR got their recipe via the Norwegian Embassy (which I think is hilarious). Beware that this is a pretty strong drink – it will warm you up in no time!

Ingredients:
Vodka
Burgundy or pinot noir wine (don’t use an expensive bottle!)
Port wine
Raisins
Cinnamon sticks
Cloves
Cardamom seeds
One orange
One piece of ginger
Directions:
Soak 1/2 cup of raisins in one cup of vodka. Soak for at least 30 minutes, but we usually soak overnight.
Put a large pot on the stove, over high heat. Add one cup of water and 1/2 cup sugar to the pot, and stir with a wooden spoon until the sugar is completely dissolved.
Lower the heat to medium and add your spices – two sticks of cinnamon (each broken in half); four whole cloves; six whole cardamom seeds, crushed by hand; a thinly shaved orange peel; and one small piece of ginger, peeled and cut in half. Stir again with wooden spoon. Do not allow the mix to come to a boil from this point on (otherwise you’ll burn off the alcohol).
Add the vodka-raisin mixture, two cups of burgundy or pinot noir wine and two cups of port wine.
Sweeten and spice to taste.
Serve hot off the stove, or you can also keep warm in a crock pot on low heat!
 One of our family traditions growing up was enjoying special treats that we only got once a year. We made all kinds of Norwegian cookies together and bought decadent truffles from our favorite local stores.
This year I thought I would try my hand at making truffles myself! I was a little intimidated, especially because recipes I looked up talked about fancy things like tempering chocolate. I don’t even know what that means!
I decided that I wanted to make merlot chocolate truffles, because let’s be honest – is there anything better than chocolate and wine? Surprisingly, I couldn’t find any recipes that looked decent for this, so I decided to make my own. My first few batches were fine, but I had a really hard time getting the wine flavor to actually come through. That’s when Jordan had the excellent idea to make a red wine reduction, and use that instead of straight wine. The result? Magic.

These are actually really easy to make. If I can do it with a baby on my hip, you got this too! (And no children were harmed in the production of this recipe).
Try it below, and start a new truffle tradition of your own!
Red Wine reduction:
2 cups Merlot (Or your preferred red wine. I used Merlot because I was looking for that deeper fruit flavor. Note that while you might not want to use an expensive wine, you definitely want to use one that you would enjoy drinking, because you will taste it in the truffle.)
1/4 cup sugar
Bring to a simmer, and cook until it thickens to a syrup – JUST thick enough to start coating the bottom of the pan. If it goes too long, it turns into a gloppy disaster (I tell you from experience). This usually takes me about an hour, but you do NOT need to stand and wait over it, so don’t let that discourage you.
The reduction can also be done ahead of time. I made mine in the morning and let it sit on the stove for about two hours until I came back to it, because #momlife.
Truffles:
1 1/2 cup semi-sweet chocolate chips
1/2 cup heavy cream
1/4 tsp salt
1/3 cup red wine reduction (recipe above)
1/2 tsp vanilla extract
1 cup bittersweet chocolate chips
1 Tbs butter
Add the semi-sweet chocolate chips to a large heat proof mixing bowl,and set aside. Bring the milk to a boil, whisking regularly so it doesn’t scald. Pour the hot milk immediately onto the chocolate chips. Wait about five minutes, and then stir until the chocolate chips are melted and smooth. If the chocolate doesn’t melt completely, microwave the mixture in 10 second increments, stirring each time.
Once chocolate is completely melted, stir in the salt, red wine reduction and vanilla extract.
Put the chocolate mixture in the fridge and let set for 1.5-2 hours. Spread a piece of wax or parchment paper on a baking sheet. I like to store my baking sheet in the fridge ahead of time, so it’s cold for the next step. Take the chocolate mixture out of the fridge, and roll balls (approximately 2 tsp per ball) with your hands.

Try to move quickly, as the chocolate melts. If you notice that your chocolate is melting especially quickly, you can always put the mixture back into the fridge and let it re-set.
Place each truffle ball on the lined backing sheet. When you’ve formed all of the truffles (I usually get around 25), place them back in the fridge on the baking sheet.
Melt the bittersweet chocolate and butter together, either on the stove or in the microwave (using increments again so the chocolate doesn’t burn). Stir until chocolate and butter mixture is blended and smooth.
Take the truffles out of the fridge, and dip each truffle ball into the bittersweet chocolate mixture. You can use a fork for this, and they also sell special chocolate dipping tools. The first time I made these I used a corn on the cob holder, because it had thin but sharp tines. Super random, but it’s what I had! This time I used these tools, which are designed for it, and it was way easier.

Put the truffles back in the fridge again until the chocolate sets – about 30 minutes. These can be served cold or room temperature, whatever your preference. Decorate however you like!

Since the truffles have no preservatives in them they should be stored in the fridge, and are good for two weeks.
Let me know what you think in the comments!
Want more celebration in your inbox? Be sure to subscribe so you don’t miss another post!

Christmas is such a magical season. I remember that as a kid the entire month of December was full of excitement, festivity and happiness. Everywhere you turned there was Christmas music playing, the smell of freshly baked cookies filling the house, and all the streets and houses were decorated with bright, happy lights.


Want more celebration in your inbox? Be sure to subscribe so you don’t miss another post!