this is a page for

Category: Easter

Raspberry French Toast Casserole

Raspberry French Toast Casserole. Cinnamon-coated bread, fresh raspberries, and tangy cream cheese, topped with a delicious brown sugar streusel. Oh and easily prepared the night before. In one bowl. You guys, it really doesn’t get better than this! Brunch just got elevated, and easier!

easy french toast casserole

French toast holds a special place in my heart. When Jordan and I were first dating, he would come visit me in Seattle and made french toast for me and my roommates every time. It was so sweet and thoughtful! Now that we have a family, I’m all about taking the flavors of french toast that we love and making the process a little easier – by making french toast into a casserole!

easy brunch recipe
french toast casserole

How To Make: Raspberry French Toast Casserole

Let’s dive into the flavors, shall we? This raspberry french toast casserole starts by making a quick and simple cinnamon egg custard. Just like you would for traditional french toast. Secondly, we coat the cubed bread in the custard. Thirdly, we layer the soaked bread in a casserole dish with cream cheese and raspberry preserves, and let sit overnight. (I just ordered this beautiful ceramic casserole dish, and right now it’s on sale!)

The next morning, we make the brown sugar streusel, sprinkle it over the casserole, and bake! Then let your nose (and stomach!) go wild as you smell it baking, because let me tell you. It smells amazing. When it’s done baking, serve with your favorite french toast extras like maple syrup and fresh raspberries. Divine.

simple french toast casserole
easy raspberry french toast casserole

What Bread Should I Use?

Just like with traditional french toast, the type of bread that you use in this raspberry french toast casserole matters. My three favorites to use are Brioche, Challah and French Bread. These are all soft, spongy breads that are amazing at soaking up the custard for a delicious casserole. None of them should have hard crusts, you should easily be able to press into them with the pad of your thumb.

Fun fact: Did you know that french toast originated from a french recipe called “pain perdu”, which means “lost bread”. It was created as a way to use stale bread instead of throwing it out! This recipe uses fresh bread vs stale, but hey! Good to remember for when I forget to seal the bread bag, right?

easy breakfast recipe
Print
clock clock iconcutlery cutlery iconflag flag iconfolder folder iconinstagram instagram iconpinterest pinterest iconfacebook facebook iconprint print iconsquares squares iconheart heart iconheart solid heart solid icon

Raspberry French Toast Casserole

5 Stars 4 Stars 3 Stars 2 Stars 1 Star No reviews
  • Author: Kirsten Bell
  • Prep Time: 15 Minutes
  • Cook Time: 40 Minutes
  • Total Time: 55 minutes
  • Yield: 12 Servings 1x
  • Category: Breakfast
  • Method: Baking

Description

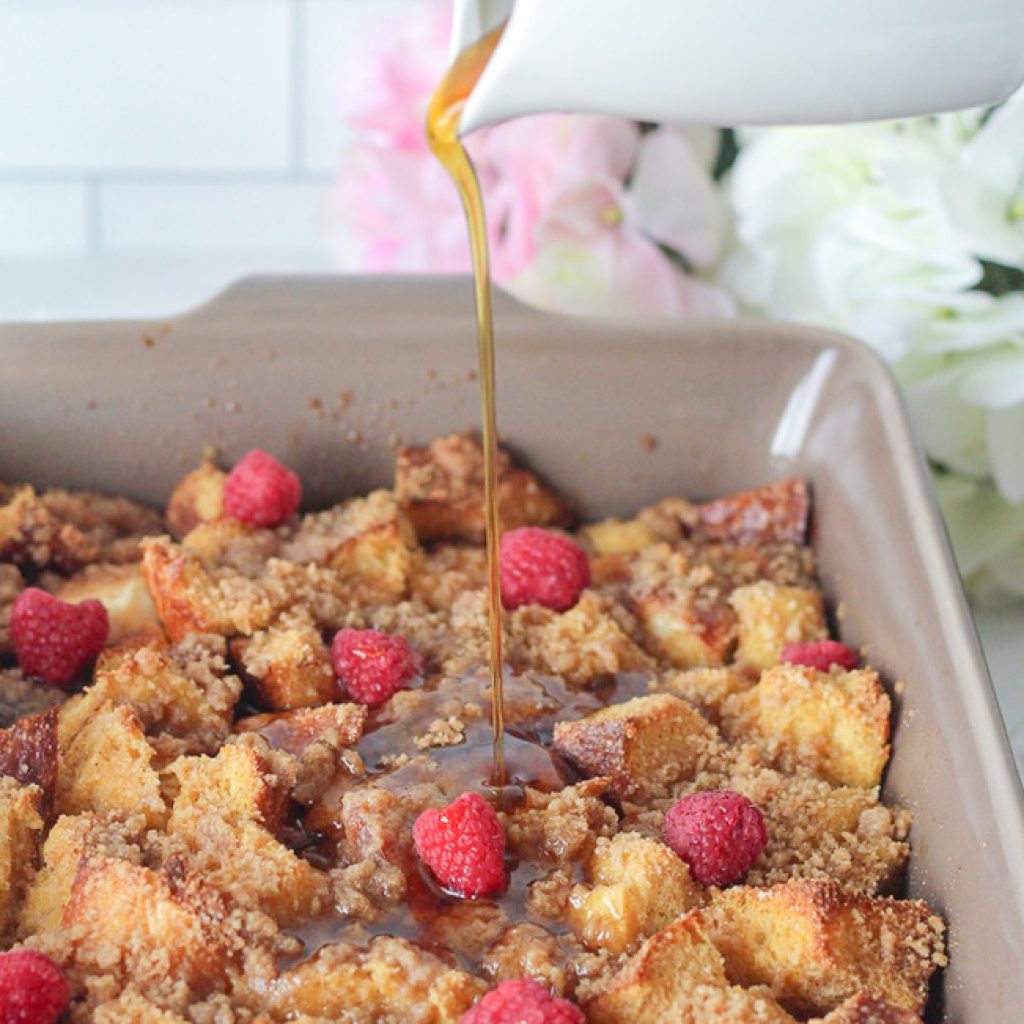
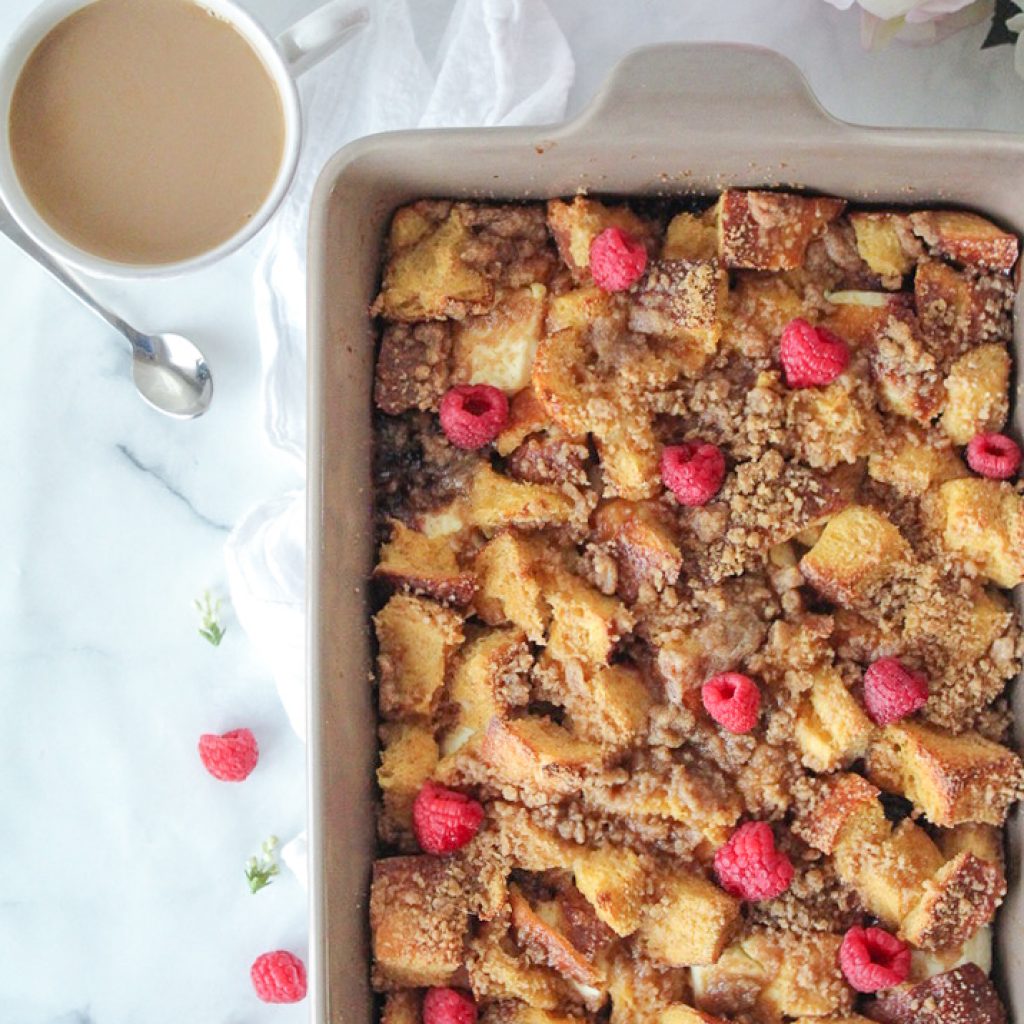
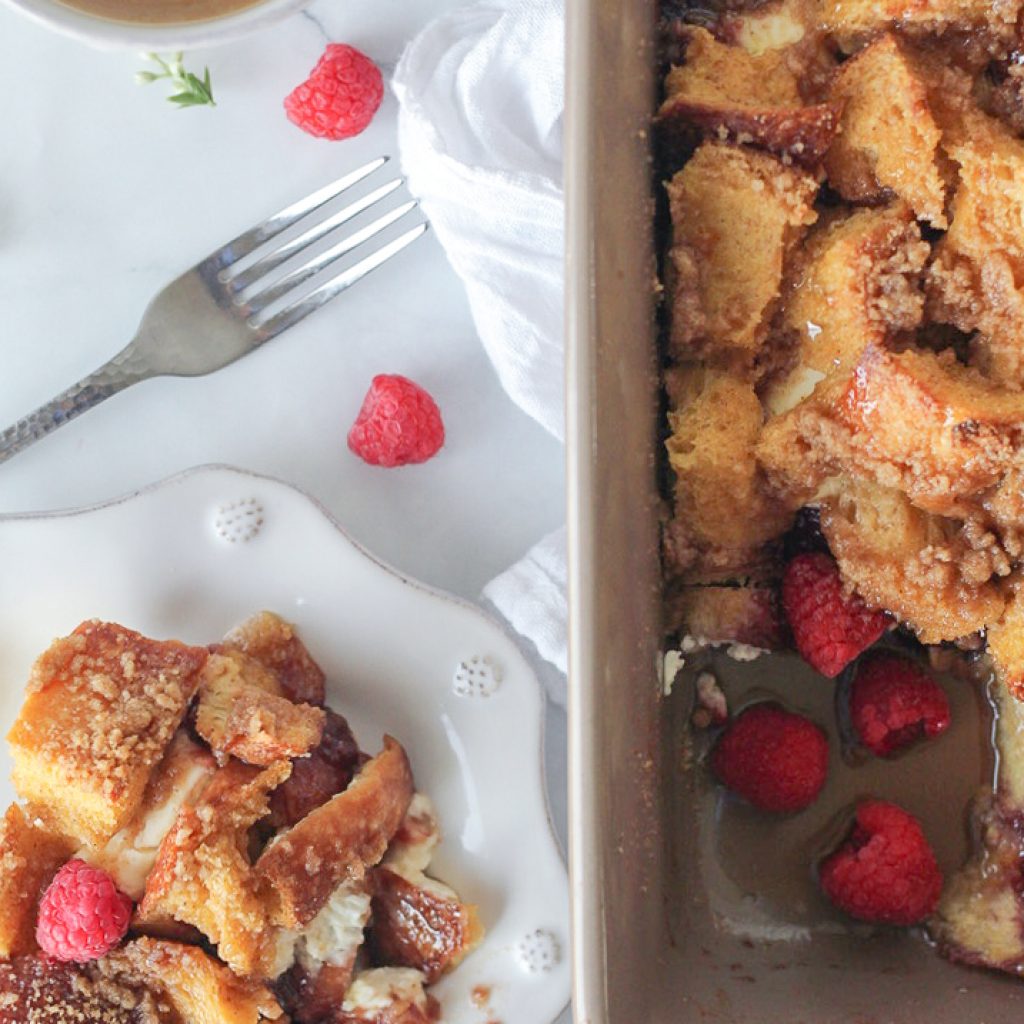
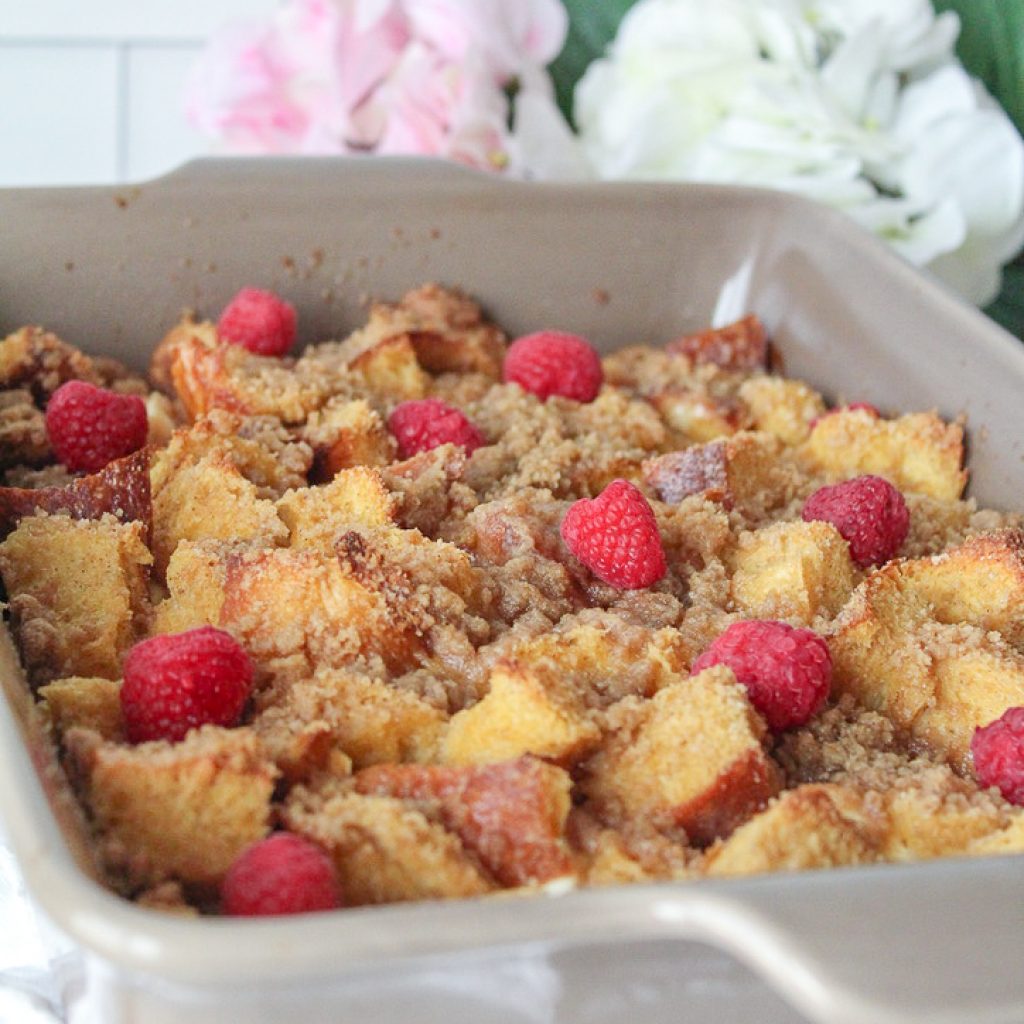
Delicious overnight french toast casserole! With cinnamon-soaked bread, fresh raspberries and tangy cream cheese, this will become your go-to breakfast recipe.


Ingredients

Scale

1 (1 lb) loaf of brioche, challah or French bread, cut into 1 inch cubes

8 eggs

2 cups whole milk

1 tablespoon vanilla extract

1 teaspoon cinnamon

1/2 teaspoon salt

8 oz cold cream cheese, cut into 1/2 inch cubes

1/2 cup raspberry preserves

Streusel Topping

1/3 cup brown sugar

1/3 cup all-purpose flour

1/2 teaspoon cinnamon

4 tablespoons salted butter, cubed


Instructions

Butter a 9×13 casserole dish, and set aside.

In a large mixing bowl, whisk together the custard ingredients, eggs through salt. Add the bread cubes, tossing with the custard to coat. Spread about half the bread cubes into the bottom of the prepared casserole dish. Evenly top the bread with cream cheese cubes and raspberry preserves. Cover with the remaining bread cubes, and pour any leftover custard over top.

Cover with foil, and allow to soak for at least 3 hours to overnight.

When ready to bake, preheat the oven to 350 degrees F. Stir together the brown sugar, flour, and cinnamon. Rub the butter into the brown sugar mixture with your fingers until it resembles bread crumbs. Sprinkle the streusel evenly over the casserole.

Bake uncovered for 40-45 minutes, or until bread is lightly golden and custard is set.

Allow to cool for 5 minutes, and then serve with maple syrup, fresh raspberries, whipped cream, or extra raspberry preserves!


Want More Breakfast Recipes? Check These Out:

Fresh Lemon Poppyseed Layer Cake

This easy, moist and delicious lemon poppyseed cake is about to become your new favorite recipe! Light and bright cake full of lemon and poppyseeds, filled with creamy lemon curd, and topped with lemon cream cheese frosting. Basically? Heaven in a bite! (Or two, or three – I dare you to stop at one!)

Cherry Orange Traditional Hot Cross Buns

There are very few things that beat the taste of warm, traditional hot cross buns, especially on Easter morning!  These are all the delicious spices and flavors of traditional hot cross buns flavors, with a few surprises! Dried cherries replace raisins, orange zest brightens up the spices, and orange icing completes these for a flavor explosion. The perfect treat for your Easter brunch, served alongside mimosas and coffee, don’t you think? (The answer: Yes, absolutely!)

traditional hot cross buns
 
We love making these sweet, spiced rolls for a special Easter morning treat, and they’re honestly just as good as an Easter dessert with a cup of coffee! Or after-church nibble. Or snack during the egg hunt. Ok basically these are perfect all day long! (Psst! For more Easter recipes, scroll to the bottom of the post!)


easy hot cross buns recipe

traditional hot cross buns


Let’s talk about a few of the flavors in these hot cross buns for a minute. The signature flavor of hot cross buns is the spiced bread. Cinnamon, cloves and nutmeg play a star roll here, especially paired with brandy soaked dried cherries. And add in the fresh orange for the icing? Heck to the yes!


cherry orange hot cross buns recipe

traditional hot cross buns

Cherry Orange Traditional Hot Cross Buns Tricks:

One of my favorite baking tricks is soaking dried fruit, usually in brandy, rum or bourbon (like in my Simple Bourbon Apple Crisp). Since the cherries in these hot cross buns are soaked overnight in brandy, they are bursting with super delicious flavor! Please note: all the alcohol is completely cooked out of these rolls.


Yeasty breads always have a few extra steps, but that doesn’t mean they’re more difficult. These traditional hot cross buns are actually incredibly easy to make! While the bread is rising, you can do other things around the house, run errands – whatever! And when you come home the house will smell like delicious homemade bread. Believe me – soooooo yummy!!


Print
clock clock iconcutlery cutlery iconflag flag iconfolder folder iconinstagram instagram iconpinterest pinterest iconfacebook facebook iconprint print iconsquares squares iconheart heart iconheart solid heart solid icon

Cherry Orange Hot Cross Buns

5 Stars 4 Stars 3 Stars 2 Stars 1 Star No reviews
  • Author: Kirsten Bell
  • Prep Time: 2 Hours
  • Cook Time: 25 Minutes
  • Total Time: 2 Hours and 25 Minutes
  • Yield: 16 Rolls 1x
  • Category: Dessert
  • Method: Baking

Description

Easy and delicious cherry orange hot cross buns! All your favorite flavors of traditional hot cross buns, with some extra flavor surprises!


Ingredients

Scale

Buns Ingredients: 

1/4 cup brandy, rum or apple juice
1 cup dried cherries (double check that there are no pits)
1/3 cup packed brown sugar
1 teaspoon ground cinnamon
1/4 teaspoon ground cloves
1/4 teaspoon ground nutmeg
1 3/4 teaspoons salt
1 tablespoon baking powder
4 1/2-5 cups all-purpose flour
1 1/4 cups warm milk
1 package yeast
2 eggs, plus 1 yolk
6 tablespoons butter, melted
1/2 teaspoon vanilla extract
1 orange, zested

Icing Ingredients: 

1 cup powdered sugar
4 teaspoons fresh orange juice
1/2 teaspoon vanilla extract


Instructions

Combine the dried cherries and brandy in a small bowl, and cover with plastic wrap. Allow the cherries to soak 12 hours, or preferably overnight.

In a medium mixing bowl, whisk together the dry ingredients, brown sugar through flour, and set aside. In your stand mixer fitted with the paddle attachment, dissolve the yeast into the warm milk. Cover with plastic wrap and let sit 3-5 minutes or until it starts to foam. Add the eggs (reserving the one extra yolk), butter and extract, mixing until combined. Add the flour mixture in three batches, mixing until just combined each time. Stir in the cherries and orange zest.

The dough should be soft and a little sticky, but not so sticky that it’s sticking to the sides of the stand mixer bowl. Add extra flour, a tablespoon at a time if this is the case. If the dough can be formed into a ball and doesn’t stick to your hands, it’s done.

Knead the dough lightly, either with your hands on a floured surface, or in your stand mixer fitted with the dough hook on medium speed for about 2 minutes.

Grease a large mixing bowl liberally with melted butter. Set the ball of dough into the bowl, turning once so the top is also greased. Cover with plastic wrap, and allow the dough to rise in a warm place for 1 hour or until doubled in size. I always turn my oven on to the lowest temperature (for my oven that’s 170 F), and once it’s preheated I turn it off. Then I let the dough sit in the warmed (but off!) oven.

When the dough has risen, punch it down to release any air bubbles that have formed. Grease two baking dishes. Divide the dough into 14-16 balls, pinching the bottoms so they stay moist while baking. Cover, and let rise again for 30-45 minutes or until doubled in size.

Now for baking! Preheat the oven to 350 F. Combine the extra egg yolk with a teaspoon of water. With a pastry brush, brush the rolls with the egg wash. Then bake at 350 for 20-25 minutes, or until the rolls are golden brown.

While the rolls cool, prepare the icing. Combine the powdered sugar, vanilla extract and orange juice in a small bowl, whisking with a fork until smooth. If it’s too thick, add more orange juice a teaspoon at a time. Transfer to a pastry bag (no need for a tip), and pipe the icing in a cross over each cooled roll. Serve immediately!

Cover leftover rolls tightly, and store on the counter for 1-2 days, or in the refrigerator for up to a week.


My favorite little taste tester approves!


Want More Easter Inspiration? Check out These Recipes:

Traditional Carrot Cake with Ginger Cream Cheese Frosting

Easter is just a week away, and I can’t wait! All the egg hunts, Easter baskets, and yummy food await! This is the first year we’re doing a real Easter egg hunt with Charlotte, and I’m so excited! When I think of traditional Easter desserts, the first thing I think of is carrot cake! This is a moist cake, with lots of spices, topped with delicious ginger cream cheese frosting.

It’s amazing how much moisture there is in carrots and apples! Make sure you use fresh carrots, not pre-grated ones. If you buy them already grated, they’ll be too dry. Believe me, I tried it! Plus it’s really easy to grate carrots, so it’s not worth paying a premium! 

The ginger in the cream cheese frosting is so good. Fresh ginger is beyond delicious, and really sets this carrot cake apart. You can of course omit it, but I promise you won’t want to!

Cake Ingredients:

3 cups all-purpose flour
2 teaspoons baking soda
1 teaspoon salt
1 teaspoon cinnamon
1/2 teaspoon ground ginger
1/4 teaspoon ground nutmeg
1 cup melted butter
1 cup granulated sugar
1/2 cup brown sugar
1 teaspoon vanilla extract
4 eggs
3 cups freshly grated carrot
1 apple, skinned and grated
3/4 cup chopped pecans

Ginger Cream Cheese Frosting Ingredients: 

1 cup butter
16 oz cream cheese
5 cups powdered sugar
3 teaspoons vanilla
8 inch piece of fresh ginger, peeled and grated

Directions: 

Grease and line the bottoms of three 6″ cake pans. Preheat the oven to 350 F.

In a medium mixing bowl, whisk together the dry ingredients, flour through nutmeg. Set aside.

In a mixing bowl fitted with the paddle attachment, beat together the butter and sugars until light and fluffy. Add the vanilla. Add the eggs one at a time.

Add the dry ingredients, mixing on low speed until just combined. Gently fold in the carrots, apple and pecans.

Distribute the batter between the three cake pans, and bake for 35-40 minutes or until a toothpick comes out with moist crumbs. Allow to cool in the pans for 10 minutes before transferring to a cooling rack.

For the frosting: In the bowl of a stand mixer fitted with the paddle attachment, beat together the butter and cream cheese. Add the powdered sugar one cup at a time, followed by the vanilla and ginger. Beat until light and fluffy.

http://www.thiscelebratedlife.com/search/label/recipes

A Blue & White Easter Brunch Tablescape

Blue and white is one of my all-time favorite color combinations. It’s so fresh and classic, and works for any event! This year as I was putting together my Easter brunch table, I knew it had to be blue and white with pops of beautiful, bright colors!

On the table: 

I love layering plates! It creates such depth to the table, and an opportunity to create a much more interesting table. I chose plates all in white and blue, and love how it turned out! I love how each plate has a different pattern and texture – it’s so visually appealing.

The beautiful scalloped tea plates are perfect for small bites and appetizers to start the meal, the salad plates for salad (shocker), and the dinner plates for the main event! I secretly get a little excited when I see lots of plates because it means the host has something really special planned!

Since this is for a brunch, of course I included these beautiful coffee cups! I love the details – it’s the perfect cup to linger over, slowly sipping and enjoying a brunch with friends! If you’re planning an Easter dinner instead of brunch, still keep the coffee cups! Many people enjoy some coffee or tea with dessert.

The serving pedestal and tray may be my favorite pieces on the table! I love their beautiful, bright colors and floral design. There is such attention to detail – I absolutely adore the little flower on the base of the pedestal! The dahlia napkin rings are so pretty, and everyone who sees them is instantly delighted. They’re so well made, and are a beautiful detail for each guest to enjoy.

I hope you have a beautiful and happy Easter, surrounded by good company, delicious food, and an egg hunt or two!

This Celebrated Life