this is a page for

Category: savory

Cheesy Pesto Rolls

Your average dinner rolls just got a major facelift! This cheesy pesto roll recipe may take a little time, but the payoff is more than worth it! Full of delicious cheese and rich pesto, these rolls are sure to be the talk of your dinner table. The best part? They freeze easily, so you can make a batch over the weekend and pull a few rolls out whenever you need! These are perfect served with a big salad, or my Tomato Basil Soup.

I’d recommend reading through the directions before getting started on these. They actually are really easy, but it helps to familiarize yourself with the steps before jumping in. I secretly love making bread, because of all the different pauses to let it rise! In college I used to bake homemade bread while studying, and found it really calming and therapeutic.

These days I use the time between each stage to clean the kitchen, do a load of laundry, feed Charlotte lunch – the list goes on haha! And with the hands on time so spread out, these delicious  pesto rolls end up feeling like they were no work at all! Added bonus: your house smells like freshly baked bread. Pretty sure there’s not a candle in this world that smells better than that!

Ingredients: 

3 2/3 cups bread flour
1 1/2 teaspoons salt
1 packet dry yeast (I use Red Star)
1 teaspoon cane sugar
1 1/4 cups warm water (115-117 degrees)
1/2-1 teaspoon olive oil
1 (7 oz) container of fresh basil pesto
1 1/2 cups grated mozzarella cheese
3/4 cups grated parmesan cheese

Directions: 

Combine the flour, salt, yeast and sugar in the bowl of a stand mixer, fitted with the dough hook attachment. Measure the water into a microwave safe measuring cup, and microwave for about 1 minute. It should be warm, almost hot to the touch. Pour the water over the flour mixture, and mix on medium speed until the dough clumps together into one mound. If the dough seems dry, add more water a teaspoon at a time.

After the dough has formed together, knead for about 5 minutes in the stand mixer, or 10 minutes by hand on a floured surface. The dough is ready when it’s soft and almost feels bouncy. Drizzle the olive oil into a large bowl, coating the sides of the bowl as well. Lay the dough into the bowl, turning it a few times to cover all the dough with olive oil. Cover, and allow to rise in a warm place for about an hour. I put the covered bowl into my oven, and then preheat the oven to 170. The minute it reaches 170, I turn it off. Don’t forget to turn it off – I did that once and it kind of weirdly cooked the dough. Oops!

Lightly grease a 9×9 casserole dish. Remove the dough from the oven, uncover it, and punch the dough down a few times to pop any air bubbles that may have formed. Turn the dough onto a floured surface, and dust the top of the dough with a little flour too. Roll the dough out into a rectangle, about 12 inches by 15 inches. Remember that it doesn’t have to be perfect, just as close to a rectangle as you can get. Add extra flour to the work surface as needed to the dough doesn’t stick!

Spread the pesto evenly over the dough, and then top with both the shredded mozzarella and parmesan. Carefully roll the dough, with the longer side facing you. Cut the log into 12 even pieces using a serrated and/or sharp knife, and lay each piece into the 9×9 casserole.

Cover the casserole dish with plastic wrap or foil again, and place into the oven. Again, I like to then preheat the oven to 170, and turn it off immediately when it reaches temperature. Allow to rise for about 45-60 minutes, or until the rolls are roughly doubled in size.

Uncover the bread, leaving it in the oven, and preheat the oven to 375 f. Bake about 30-35 minutes, or until the tops off the rolls are just beginning to brown, and the centers don’t look doughy anymore. Remove from the oven, and allow to cool about 15 minutes. Enjoy!

http://www.thiscelebratedlife.com/search/label/recipes

White Wine and Parmesan Risotto

Risotto is one of my favorite foods on the planet. It’s a major comfort food recipe, and is a perfect side dish for pretty much anything! This white wine and parmesan risotto recipe is creamy and cheesy, with just a hint of white wine. I love this as a side dish for my Garlic Salmon, but have also been known to eat a bowl of it on its own as a main course!

This is an easy parmesan risotto recipe that’s great all year-round, and will quickly become a family favorite. Scroll to the bottom of this post for more recipes to complete your meal!

Want more risotto recipes? Also check out my Easy, Creamy Lemon Risotto Recipe!

Used In This Post: 


Healthy Lemon and Garlic Baked Salmon

Your new favorite weeknight meal: lemon and garlic baked salmon! This easy baked salmon recipe is bursting with flavor, and is so delicious, you’ll feel like you’re cheating on those New Years resolutions. But you’re not! And the best part? It comes together in about 45 minutes, making this our go-to healthy weeknight meal.

easy baked salmon recipe
 

This recipe has been used by my family for over two decades. Which makes me feel super old, but that’s ok! My parents got it from a family friend, and it’s one of those recipes that is crazy good probably because it’s crazy simple. The flavors are bright and fresh, and I love all the superfood ingredients like olive oil, garlic and all those omega-3s in salmon!

The garlic caramelizes as it cooks, and the sweet garlic flavor pairs so perfectly with the bright lemon. Add in the light taste of salmon and herby, slightly lemony parsley, and you’ve got yourself one of the most delicious flavor combos ever!


Tips For Lemon and Garlic Baked Salmon:

  • Don’t skip the fresh parsley! It wilts and holds the sauce on top of the salmon. This helps the salmon stay moist, and is so delicious!
  • Allow your salmon to come to room temperature before cooking. About 15-20 minutes on your counter will do the trick!


lemon and garlic baked salmon

In the summer we cook this on the grill. When I think back on some of my best summer memories, it was eating this lemon and garlic salmon on the deck!  And when it’s super cold out like it is now, we bake it in the oven. It’s delicious either way, and I’ve included directions for both below! I love to dress up this salmon by serving it with my White Wine and Parmesan Risotto. or if I’m going for a simple meal I serve it with a my Kale Caesar Salad.
 
Print
clock clock iconcutlery cutlery iconflag flag iconfolder folder iconinstagram instagram iconpinterest pinterest iconfacebook facebook iconprint print iconsquares squares iconheart heart iconheart solid heart solid icon

Healthy Lemon and Garlic Baked Salmon

5 Stars 4 Stars 3 Stars 2 Stars 1 Star No reviews
  • Author: Kirsten Bell
  • Prep Time: 15 Minutes
  • Cook Time: 30 Minutes
  • Total Time: 45 minutes
  • Yield: 8 Servings 1x
  • Category: Dinner
  • Method: Baking

Description

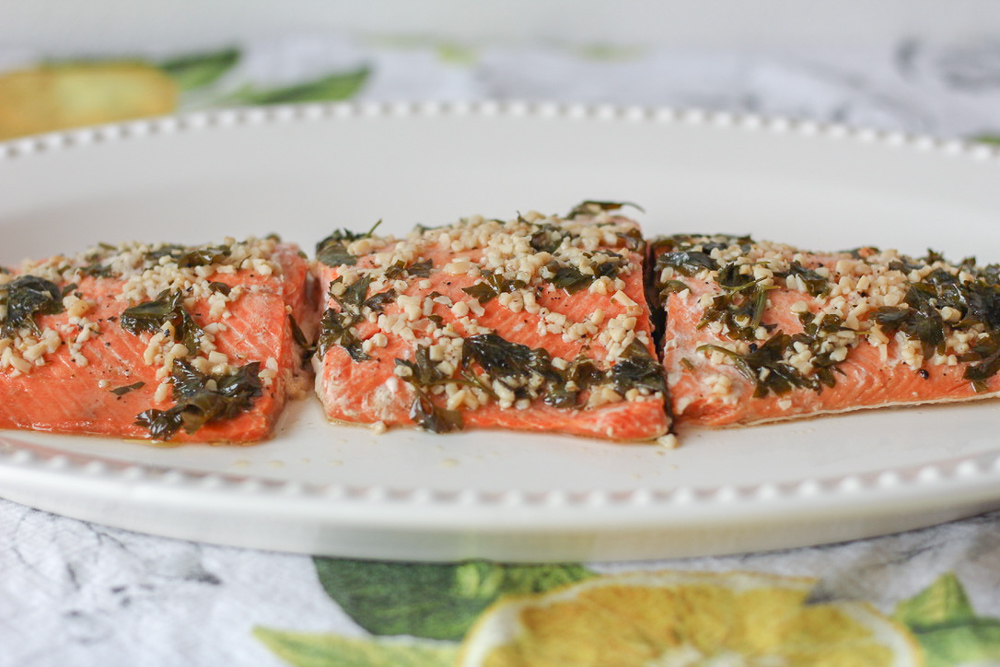
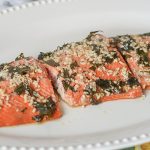
Easy, delicious and flavorful lemon and garlic baked salmon!


Ingredients

Scale

1 (2 lb) wild caught piece of salmon*
1/2 cup olive oil
6 garlic cloves, crushed
1/2 cup lemon juice
Zest of 1 lemon
1 cup chopped parsley
2 teaspoons lemon pepper


Instructions

Sauce Directions:

In a small saucepan, heat garlic in olive oil until golden. Add lemon juice to the garlic. Simmer over medium-low heat until it thickens a bit, about 5 minutes. Add parsley and stir. Sprinkle lemon pepper  over the flesh side of the salmon.

Oven Directions:

Lay the salmon flesh side up on a foil lined baking sheet. Broil 3-5 minutes, or until the salmon just begins to brown. Pull the foil up around the salmon, and then pour the garlic sauce over the salmon. Lightly close the foil to create a tent over the fish. Bake at 400 degrees for about 30-40 minutes, or until the fish is cooked to your satisfaction. (Salmon can technically be eaten raw, and just like beef everyone has different ideas of what “done” looks like. For us, if the salmon easily flakes with a fork, we call it done!)

Grill Directions: 

Grill salmon until golden. Flip fish skin side down in casserole or foil. Pour garlic sauce over, making sure the foil holds all the oil, and finish cooking to your satisfaction.


Notes

We also use frozen salmon from Costco, which is way more cost-effective since we don’t live near a coast! Just thaw the salmon you want to use, and then follow directions as usual.

lemon and garlic baked salmon

Recipes To Complete Your Meal: 

Super Good, Superfood Smoothie

I know you’re used to seeing more baked goods from me, but I can’t live off of cupcakes – right? So today I’m sharing my easy superfood smoothie recipe with you! It’s one that Jordan and I both enjoy drinking for breakfast, and sometimes even lunch because it’s packed with protein, fiber and tons of vitamins! I also love that it’s a paleo, gluten free and vegan smoothie so it’s one that most people can have.

Used In This Post: 

Some of the key superfood ingredients in this smoothie are spinach, avocado and berries. Spinach is so good for us – probably everyone could benefit from eating more of it! It’s good for skin, hair and bone health and is loaded with protein, iron, vitamins and minerals. Avocado is another really powerful superfood. We all probably know that avocado is full of healthy fats. But it’s also a great source of fiber, folate, potassium, vitamin E and magnesium. Next up: blueberries! I love using frozen blueberries in this smoothie recipe because they’re a pretty inexpensive berry when you buy them frozen (thank you Costco!). They are also stocked with antioxidant and anti-inflammatory, properties and are high in Vitamin C and potassium.

For even more nutritional value, we love adding flax seeds and chia seeds to our smoothies. One thing that I LOVE about our Vitamix blender is that it’s powerful enough to turn the seeds to powder. So you’d literally never know they were in there! 

Whip up one of these smoothies this week for breakfast or a post-workout nutrient boost!

Ingredients: 

1 cup almond milk (I love the organic Silk almond milk)
1 packed cup fresh spinach
1 cup frozen blueberries (or berry mix)
1/2 cup avocado (I like the frozen avocado at Costco)
1 tablespoon almond butter (We use Justins!)
1 teaspoon flax seeds
1 teaspoon chia seeds

Directions: 

Load all the ingredients into your Vitamix machine or other blender, and blend until smooth. Top with some fresh berries if you like, and enjoy!

http://www.thiscelebratedlife.com/search/label/recipes

Grown Up Three Cheese Macaroni and Cheese

Oh man, do I have a winner recipe for you all today. Homemade macaroni and cheese that is so melt-in-your-mouth good, you will never reach for stovetop mac and cheese again. Ever. Guaranteed! This baked macaroni and cheese is designed with grown up tastes in mind, but it’s really good for the whole family. My 19-month loves it, and i love it because this is a great macaroni and cheese for a crowd, freezes really well and makes for delicious leftovers. Winner winner!

Alright so what makes this macaroni and cheese “grown up”? First, the addition of onion and garlic. We cook this down so the flavors become really mild, but they add a delicious complexity to the flavors. Then we add nutmeg and cayenne. Cayenne for just a tiny hint of spice (very little), and nutmeg for a hint of sweetness. Then we mix in our three cheeses: Sharp white cheddar, creamy gruyere and nutty parmesan. The ultimate cheese trinity! All of this combined makes the most delicious macaroni and cheese you’ve ever tasted. If I was going to ask for one last meal, this might be it haha!

Ingredients:

3 cups uncooked penne pasta noodles
3 tablespoons butter
1 large onion, diced (about 2 cups)
12 cloves garlic, chopped (this cooks down, believe me)
1/2 teaspoon salt
1/4 teaspoon ground black pepper
1/4 teaspoon cayenne
2/3 cups flour
4 cups milk
1/2 teaspoon nutmeg
2 stalks green onion, diced
8 oz sharp white cheddar, shredded
8 oz gruyere, shredded
1/2 cup parmesan cheese, shredded

Directions:

Preheat the oven to 375. Cook the pasta according to package directions using the minimum cook time. Pasta will be al dente, but will continue cooking later.

In a large pot over medium heat, cook the onion, garlic, salt, black pepper and cayenne in butter until translucent. About 5 minutes. In a large bowl, whisk together the nutmeg, flour and milk. Then add the flour mixture to the pot with the cooked onion mixture. Stir constantly over medium heat until the liquid comes to a boil, about 10 minutes. Continue stirring for 2-3 minutes until sauce is thickened. Remove from heat, and stir in cheeses until melted. Stir in pasta.

Spoon the mixture into a large, ungreased 9×13 casserole dish. Bake for 40-50 minutes or until mixture is bubbly and lightly toasted on top. Allow to cool 10 minutes before serving.

This Celebrated Life