this is a page for

Category: valentine’s day

Orange Scented Shortbread Cookies With Rose Water Glaze

I am so excited to share this shortbread cookie recipe with you today! These melt-in-your-mouth delicious cookies are beautiful, quick and easy. You seriously won’t believe how easy these are. And the flavor combination of orange and rose? Un. Real. You’ll have to try them to believe it, and then you’ll never go back!

Let’s talk special ingredients. In the cookies, I used orange blossom extract along with orange zest. The flavor of orange blossom extract is softer and more delicate than traditional orange. I really like how subtle the flavor is in the cookies, and how the orange zest brightens is up just a tetch. Honestly these cookies could totally be eaten alone (I’m your witness, I probably ate 5), but oh my gosh they are made even more outstanding by the glaze. Which brings me to the next special ingredient – rose water extract. This extract smells very perfumy, and you definitely have to toe the line between soap and delicious. But when you hit that balance, it’s total perfection.

Makes about 18-20 small cookies

Cookie Ingredients: 

1 cup butter, softened
1/2 cup powdered sugar
1/2 cup corn starch
1 1/2 cups all-purpose flour
1/2 teaspoon orange blossom extract
1/4 teaspoon vanilla
Zest of one orange (keep the rest of the orange for the glaze)

Glaze Ingredients:

1 tablespoon fresh orange juice
1 cup powdered sugar
1 teaspoon rose water extract

Directions: 

In the bowl of your stand mixer fitted with the paddle attachment, whip the butter until light and fluffy. Add the powdered sugar and cornstarch, mixing until well combined. Add the flour, extracts and orange zest, and mix until just combined. It may look too dry, and like it won’t come together. Just keep mixing – it will!

Roll the dough into two logs, and wrap with plastic wrap. Refrigerate for 1-2 hours, or until the dough is cold. Preheat the oven to 300, and line two baking sheets with parchment paper. Arrange the cookies on the lined baking sheets, and bake about 30 minutes, or until the edges of the cookies are just beginning to color. Be sure not to overbake! Remove from the oven, and let cool on the sheets for about 5 minutes before transferring them to a cooling rack.

For the glaze: When the cookies are completely cooled, combine all the ingredients in a small bowl. I like to use a fork to combine the powdered sugar with the orange juice. Dip each cookie into the glaze, and allow to dry on the cooling rack until the glaze is hardened. Garnish with dried rose buds (just make sure they’re food grade like these), and serve!

http://www.thiscelebratedlife.com/search/label/recipes

Dense and Fudgy Brownies With Cream Cheese Frosting

Valentine’s Day is this week, can you believe it? If you haven’t started thinking about a dessert yet, fear not! These dense and fudgy brownies are so quick and easy to make, and are delicious with or without the cream cheese frosting. And made in just one bowl? Heck yes! So grab a bowl and spatula, let’s make some brownies!


Brownies from scratch are incredibly easy – I’d actually say they are 100% just as easy as boxed brownies. But you have so much more control over the ingredients, and they’re also way less expensive. What I also love about these brownies is that they’re not overly sweet, especially if you opt to skip the frosting. They taste like you’re biting into real chocolate!

I am all about one bowl recipes, and you guys are too! They’re always my top performing recipes, and I’m not surprised! I love baking but I’m not a huge fan of kitchen clean up (just ask my husband, ha!). So I love making all of our lives easier and happier with one-bowl desserts.


Print
clock clock iconcutlery cutlery iconflag flag iconfolder folder iconinstagram instagram iconpinterest pinterest iconfacebook facebook iconprint print iconsquares squares iconheart heart iconheart solid heart solid icon

Dense and Fudgy Brownies With Cream Cheese Frosting

5 Stars 4 Stars 3 Stars 2 Stars 1 Star No reviews
  • Author: Kirsten Bell
  • Prep Time: 15 Minutes
  • Cook Time: 25 Minutes
  • Total Time: 40 minutes
  • Yield: 12 Brownies 1x
  • Category: Dessert
  • Method: Baking

Description

Easy, dense and fudgy brownies for true chocolate lovers! Topped with cream cheese frosting for an extra delicious twist!


Ingredients

Scale

Brownie Ingredients:

1/2 cup strong brewed coffee
1/2 cup butter, melted and slightly cooled
1 teaspoon vanilla extract
2 eggs, beaten
3/4 cup all-purpose flour
3/4 cup sugar
2/3 cup cocoa
1/4 teaspoon salt
1/3 cup semi-sweet chocolate chips

Frosting Ingredients:

8 ounces cream cheese, softened
1/2 cup butter, softened
2-3 cups powdered sugar
1 teaspoon vanilla


Instructions

Brownie Directions: 

Preheat the oven to 350 degrees f, and grease an 8×8 baking dish. Set aside.

Combine the coffee, butter, vanilla and eggs in a large mixing bowl. Add the sugar, mixing until just combined. Add the cocoa and salt, give it a quick stir, and then stir in the flour until no flour shows anymore. Stir in the chocolate chips.

Spread batter evenly into the greased baking dish. Bake for 25-30 minutes, or until a toothpick comes out with moist crumbs. Cut into squares, or use a festive cookie cutter and snack on the scraps (waste not, right?).

Frosting Directions:

In the bowl of a stand mixer fitted with the paddle attachment, beat together the cream cheese and butter until light and fluffy. Add two cups of powdered sugar and vanilla, increasing speed to high for 2-3 minutes once all the sugar is incorporated. Add more powdered sugar if the frosting is too soft to hold a peak.

For the coloring, I used Americolor Deep Pink gel color in varying amounts for the different shades of pink.


Notes

I always use gel colors instead of liquid food coloring, because you don’t need to worry about messing up frosting consistency. If you haven’t used gel before, I recommend putting the color onto a toothpick, not directly into the bowl. That’s because gel coloring is really strong, and I’ve messed up by adding wayyyy too much. It’s easy to do!

To achieve this festive Valentine’s Day look, I used three different Wilton decorating tips. The first tip which made the light pink, larger flowers was Tip No. 224. The star tip that made the brighter pink stars was Tip No. 18, and the cream circles was Tip No. 5. I have this decorating piping tip kit, which I love! It has all the basics and I love the storage case. Plus it’s way more cost effective to buy the kit rather than individual tips.

If you love chocolate as much as I do, check out the following recipes too!

Chocolate Bundt Cake with Raspberry Dark Chocolate Ganache

S’mores Cupcakes with Smoked Chocolate Ganache

Chocolate Covered Strawberry Cake

Chocolate Bundt Cake with Dark Chocolate Raspberry Ganache

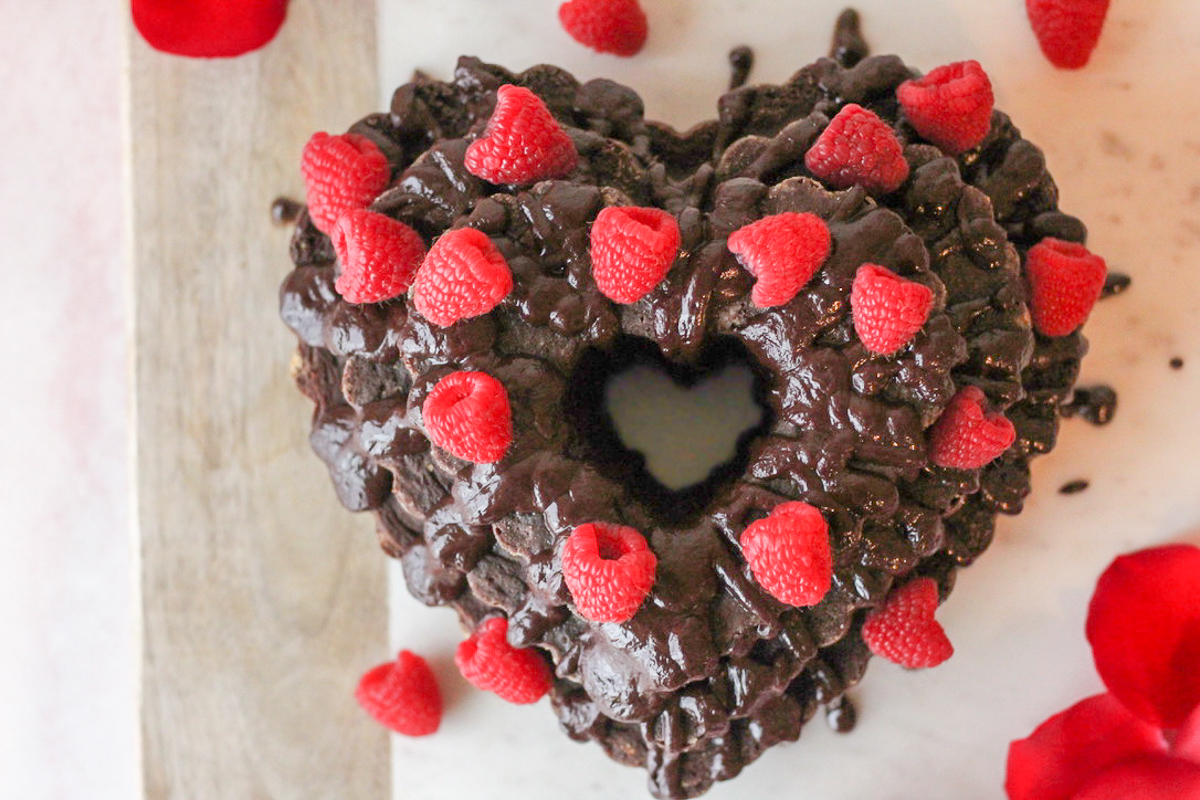
Ready for a chocolate overload cake? (As if that was even a thing.) I’ve got you covered, just in time for Valentine’s Day! This dense, moist chocolate cake is covered with dark chocolate raspberry ganache in the place of frosting – perfect for those of you who love cake but might not always love frosting!

We got this beautiful heart bundt cake pan as one of our wedding presents, and I think it’s so beautiful! As is true with any bundt pan, make sure you grease the pan really well, and also dust with flour! Bundt cakes are notorious for sticking, you may have seen on my Instagram stories a few weeks back that my cake stuck when I didn’t flour the pan!

That’s the only special instruction for this recipe – it’s really simple overall, and I know you’ll love it! If you’re looking for a chocolate Valentine’s Day dessert, this is it! Guaranteed to satisfy even the strongest chocolate craving!

Equipment Used: 

Ingredients: 

2 cups all-purpose flour
1 1/2 cups granulated sugar
3/4 cup cocoa powder
3/4 teaspoon baking powder
1/4 teaspoon baking soda
1 teaspoon salt
1/2 cup buttermilk
1/2 cup sour cream
1/2 cup coffee
1 cup butter, melted
2 teaspoons vanilla extract
3 eggs

Ganache Ingredients: 

1/4 cup heavy cream
3/4 cups semi-sweet chocolate chips
1 tablespoon raspberry extract or Chambord

Cake Directions: 

Preheat the oven to 350. Grease a bundt pan very well, followed by a dusting of flour. This will help prevent the cake from sticking.

Whisk together the dry ingredients, flour through salt. Set aside. In the bowl of your stand mixer fitted with the paddle attachment, combine the buttermilk, coffee, butter, sour cream and vanilla. Mix in the eggs one at a time. Add the dry ingredients, mixing on low speed until the ingredients are just combined.

Bake in the preheated oven for 50-55 minutes, or until a large toothpick comes out clean. I use large wooden skewers!

Allow the cake to cool for 15 minutes in the pan. Then carefully turn the pan upside down over a baking sheet. Allow to sit for an additional 10 minutes, then carefully lift the pan off the cake.

Ganache Directions: 

Heat the heavy cream in a saucepan or in the microwave until the cream begins to steam. Pour over the chocolate chips in a heatproof bowl, and stir until combined and the chocolate is melted and silky. If needed, heat the chocolate mixture in the microwave in 10 second increments until fully melted. Add the extract or Chambord,stirring to combine. Drizzle over the top of the bundt cake. I like to be pretty generous with my ganache! Allow to set for a few minutes, and garnish with a few fresh raspberries before serving!

http://www.thiscelebratedlife.com/search/label/recipes

Moist & Fluffy Red Velvet Cream Cheese Cookies

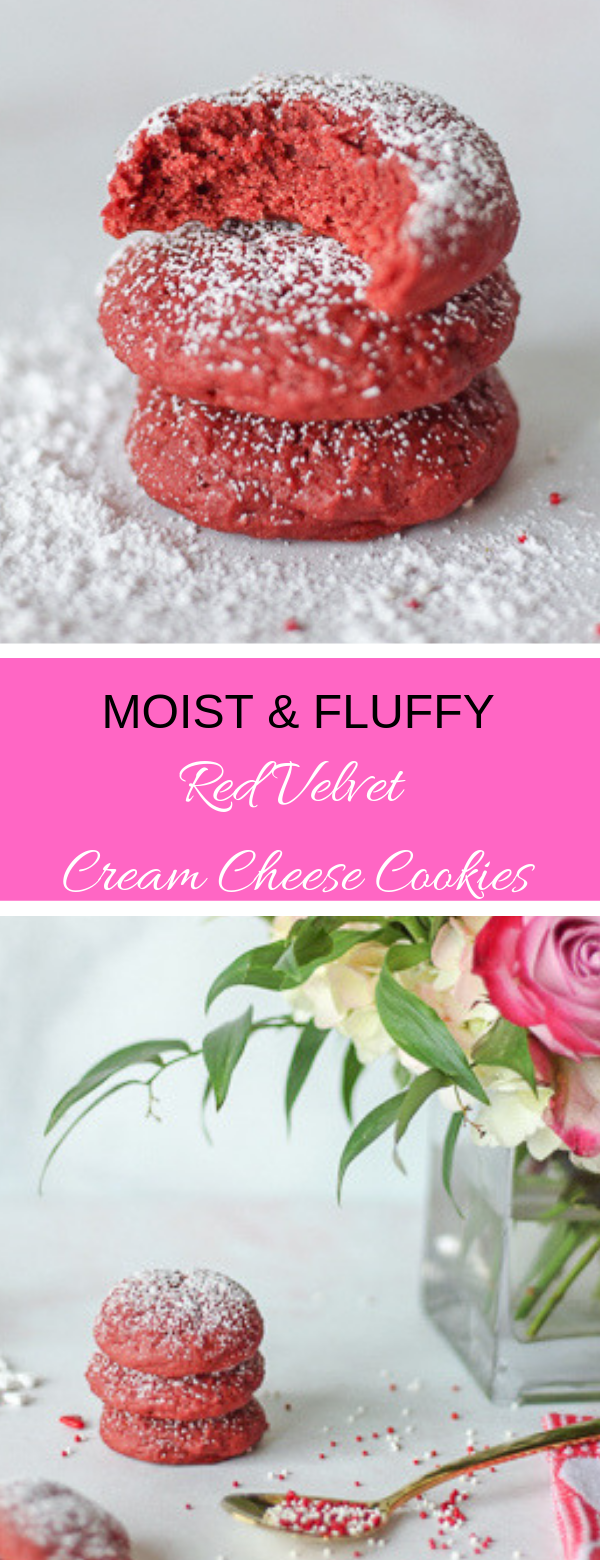
Are you guys ready for a Valentine’s Dessert recipe that will knock the socks off your friends and family? Well, these red velvet cream cheese cookies might just be it! These thick, cakey cookies literally melt in your mouth when you take a bite. And that pretty red color? Valentine’s Day cookie perfection!

You can top these pretty little cookies with festive sprinkles, or dust them with powdered sugar! When you take your first bite, you’ll be thanking me from afar!

A few notes to ensure baking success:

  • These cookies need to be chilled in the fridge for 1-2 hours. Don’t skip this step! It’s important that the butter is cold when it goes into the oven – that’s what makes cookies thick. 
  • The dough is going to be sticky, so be sure to dust your hands with flour before rolling the dough into balls. You can re-dust your hands as much as you need – I did it every 2-3 cookies. I also washed my hands a few times during the process. It’s totally worth it! 
  • Use gel food coloring, not liquid. The reason is that our solid to liquid ratio is already on the edge (see above!), so adding even more is going to make rolling these into balls a real challenge. Plus, I prefer gel color because you need way less. I always feel kind of sick dumping a whole container of red liquid color into batter or dough, and sometimes can taste the food coloring too. Not with gel! I use and love this kind

Ingredients: 

1 1/2 cups cake flour
1/2 teaspoon baking powder
3 tablespoons cocoa powder
1/4 teaspoon salt
1/2 cup butter, softened
4 oz full-fat cream cheese, softened
3/4 cup cane sugar
1 egg
1 1/4 teaspoons vanilla
Red food coloring gel
1/4 cup all-purpose flour, for rolling
Powdered sugar for dusting

Directions: 

Whisk together the dry ingredients, flour through salt. Set aside.

In the bowl of your stand mixer fitted with the paddle attachment, cream together the cream cheese and butter until light and fluffy. Add the sugar and beat until combined, then beat in the egg and vanilla. Add the dry ingredients, and mix until just combined. Add food coloring until you reach your color preference. I use gel food coloring, see notes above.

Cover the dough with plastic wrap, and chill it in the fridge for 1-2 hours.

Preheat the oven to 375.

Measure the all-purpose flour into a small bowl. Line two baking sheets with parchment paper. Dust your hands with the flour, and roll the cookie dough into 1 inch sized balls, and place them on the lined baking sheets. Re-dust your hands as many times as needed – I dusted my hands between every 2-3 cookies.

Bake 9-11 minutes, or until the bottoms are just beginning to brown. They will be soft and may still look doughy, but if you can tap the bottom of a cookie and it easily slides, they’re done!

Dust with powdered sugar when they’ve cooled, and serve.

http://www.thiscelebratedlife.com/search/label/recipes

Chocolate Strawberry Cake

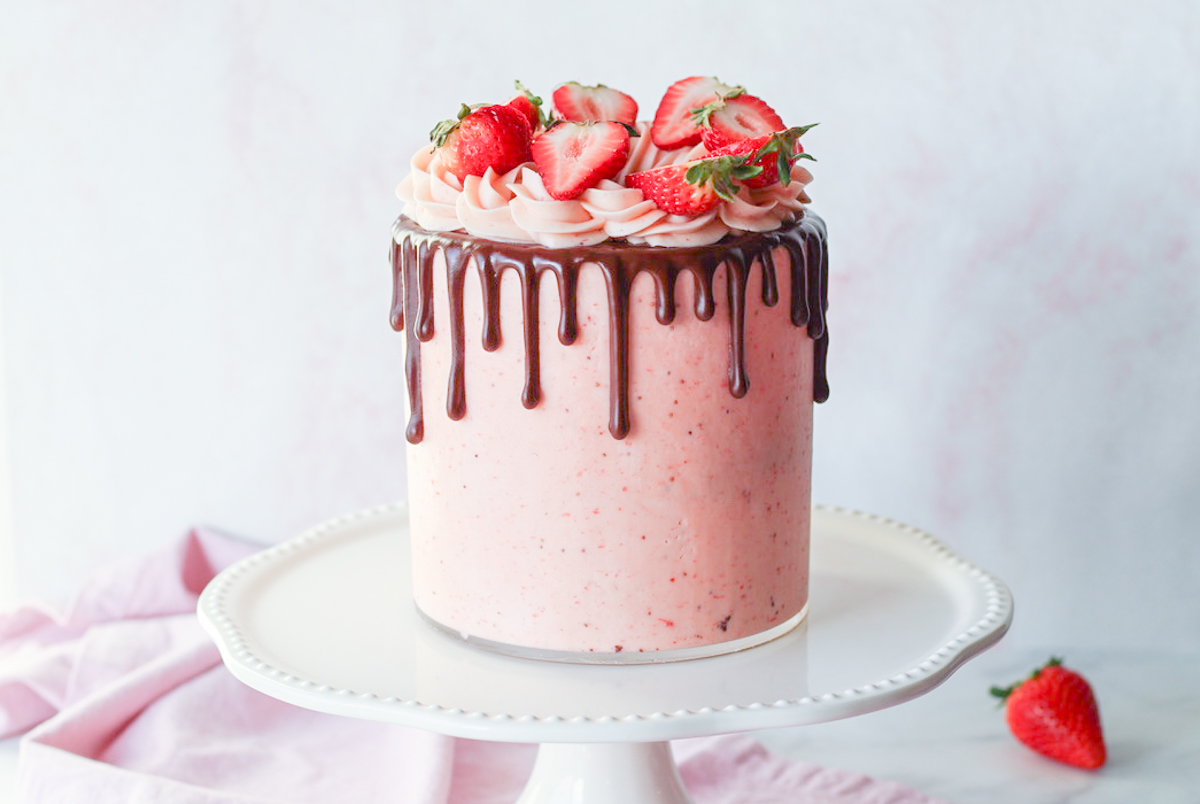
A few days ago I shared my Valentine’s Day wine picks, and today I’m sharing my easy Valentine’s Day dessert idea: Strawberry Chocolate Cake! I don’t know about you, but I’m always ready to try new strawberry dessert recipe ideas. I love the bright, juicy flavor of fresh strawberries, and they pair so well with chocolate. It’s a classic combo for a reason, right?

When I was thinking of this strawberry chocolate cake recipe, I knew that I wanted it to be rich, chocolatey, and fruity. Valentine’s Day chocolate dessert ideas are endless, and I wanted something just a little more special but still a classic dessert. And even though I originally created this recipe for Valentine’s Day, I make it all year round! It’s also a great birthday cake recipe, bridal shower cake idea, and summer cake recipe!

This cake was one of the first recipes on my site, and I recently updated it to include fresh strawberry buttercream instead of extract! It’s lick-the-spatula good, you guys. I also added thinly sliced fresh strawberries between each layer for an extra pop of berry flavor. As one of the most popular cakes here, I know you guys already loved this cake. But holy cow, it just got beyond amazing!

I always feel like fancy Valentine’s Day desserts make the holiday feel even more special, but let’s be honest. Most of us don’t have the time to make super crazy time-intensive desserts. That’s why I love this cake – because like the majority of the recipes you’ll find on my site, this cake looks beautiful and it’s a quick and easy cake recipe too! That’s a perfect Valentine’s Day dessert (or just general dessert) in my opinion!

Chocolate Cake Ingredients:

  • 2 cups all-purpose flour
  • 2 cups granulated sugar
  • 1 cup cocoa powder (I used dark chocolate cocoa powder because I wanted them really intense)
  • 1 tsp salt 1 tsp baking soda
  • 1 cup hot brewed coffee
  • 1 cup unsalted butter (two sticks)
  • 2 eggs, whisked
  • 1/2 cup buttermilk
  • 2 tsp vanilla extract

Fresh Strawberry Buttercream Ingredients:

  • 2 cups unsalted butter, softened to room temperature
  • 5-6 cups powdered sugar
  •  3/4 cup strawberry puree
  • 1 teaspoon vanilla extract
  • salt, to taste 
  • optional garnish: fresh strawberry slices

Dark Chocolate Ganache Ingredients:

  • 1 cup dark chocolate chips
  • 1/4 cup heavy cream

Cake Directions: 

Preheat oven to 350 degrees. Grease and line the bottom of three 6″ round cake pans. Set aside.

In a small pan, heat the butter and coffee until the mixture is steaming and the butter is melted. Take off the burner and let cool. (You can also do this in the microwave.)

Whisk together the dry ingredients, flour through baking soda.

Mix together the eggs, buttermilk and vanilla extract. Add the butter mixture once cooled. If the butter mixture is still too hot when you mix these together, the egg will cook.

Add the dry ingredients into the now combined wet ingredients in two batches. Fold together until just combined. Pour batter into prepared cake pans and bake at 350 for 25-30 minutes – until a toothpick comes out with moist crumbs. Allow the cake to cool in the pans for 10 minutes, then turn them upside down on a cooling rack to cool completely. This will help create a flat top for each layer.

Strawberry Buttercream and Dark Chocolate Ganache Directions: 

In your food processor or blender, blend about 10-12 large de-stemmed strawberries until smooth. (Seeds are ok.) Set aside.

Whip the butter until light and fluffy. Add the powdered sugar one cup at a time, and then add the fresh strawberry puree. Beat on low speed, scraping the sides as necessary. The frosting will look piecy at this point, and that’s ok, it will all come together. Then beat on high speed for about 3-4 minutes, or until all the strawberry is incorporated, and the frosting is light and fluffy.

Ganache and Assembly: melt the chocolate chips and heavy cream together in a small bowl. Spread the strawberry buttercream between each cake layer, and place thinly sliced strawberries between each layer too, if desired. Once the cake layers are assembled, frost the outside of the cake with the buttercream, and drip the chocolate ganache over top. I recommend letting the frosted cake sit in the fridge for about 30 minutes before adding ganache, so it’s cold. Garnish with more fresh strawberries, and serve!

I hope you enjoy!  If you’re looking for more desserts that’s just as easy and delicious, try my Strawberry Champagne Cupcakes or Simple and Delicious Vanilla Cupcakes!

http://www.thiscelebratedlife.com/search/label/recipes

This Celebrated Life