this is a page for

Category: recipes

Quick & Easy Homemade Tomato Basil Soup

We’ve been having really cold, foggy days for the last week! Cold, crawling fog that seeps straight into your bones. Perfect dementor and/or white walker weather. AND, it’s also perfect warm soup weather! Whenever I really feel chilled and cold, soup is my go-to dinner. I love that this homemade tomato soup recipe is so quick and easy, I can have it on the table, start to finish, within 30 minutes! And the best part is that it tastes like you worked on it all day. One spoonful of this homemade tomato basil soup, and you will never buy canned tomato soup again!

What I love most about this soup is that there are so many different flavors. Tomato, obviously, but also peppery basil and aromatic rosemary, all tied together with the sweet onion and caramelized garlic. In other words: savory flavor explosion! It’s also really easy to make this into a vegan/vegetarian tomato basil soup – just swap out chicken stock for vegetable stock and you’re good to go!

Ingredients:

2 tablespoons olive oil
2 yellow onions, chopped
5 cloves garlic, minced
1/2 teaspoon salt
1/4 teaspoon ground black pepper
2 teaspoons dried rosemary
2 (14 oz) cans diced tomatoes
2 cups chicken stock (or veggie stock for vegetarian version)
1 cup fresh basil leaves, chopped

Directions:

Drizzle olive oil into a large stockpot or dutch oven, and add onions, garlic, rosemary, salt and pepper. Cook over medium-low heat until the onion is cooked and translucent. Add the tomatoes (including juices) and chicken stock. Simmer for about 20-25 minutes, or until the vegetables are all soft. Add the basil leaves. Puree with an immersion blender, or transfer to a blender and blend in batches. Serve hot with grilled cheese, cheesy pesto rolls or alongside a big green salad! Enjoy!

http://www.thiscelebratedlife.com/search/label/recipes

Cheesy Pesto Rolls

Your average dinner rolls just got a major facelift! This cheesy pesto roll recipe may take a little time, but the payoff is more than worth it! Full of delicious cheese and rich pesto, these rolls are sure to be the talk of your dinner table. The best part? They freeze easily, so you can make a batch over the weekend and pull a few rolls out whenever you need! These are perfect served with a big salad, or my Tomato Basil Soup.

I’d recommend reading through the directions before getting started on these. They actually are really easy, but it helps to familiarize yourself with the steps before jumping in. I secretly love making bread, because of all the different pauses to let it rise! In college I used to bake homemade bread while studying, and found it really calming and therapeutic.

These days I use the time between each stage to clean the kitchen, do a load of laundry, feed Charlotte lunch – the list goes on haha! And with the hands on time so spread out, these delicious  pesto rolls end up feeling like they were no work at all! Added bonus: your house smells like freshly baked bread. Pretty sure there’s not a candle in this world that smells better than that!

Ingredients: 

3 2/3 cups bread flour
1 1/2 teaspoons salt
1 packet dry yeast (I use Red Star)
1 teaspoon cane sugar
1 1/4 cups warm water (115-117 degrees)
1/2-1 teaspoon olive oil
1 (7 oz) container of fresh basil pesto
1 1/2 cups grated mozzarella cheese
3/4 cups grated parmesan cheese

Directions: 

Combine the flour, salt, yeast and sugar in the bowl of a stand mixer, fitted with the dough hook attachment. Measure the water into a microwave safe measuring cup, and microwave for about 1 minute. It should be warm, almost hot to the touch. Pour the water over the flour mixture, and mix on medium speed until the dough clumps together into one mound. If the dough seems dry, add more water a teaspoon at a time.

After the dough has formed together, knead for about 5 minutes in the stand mixer, or 10 minutes by hand on a floured surface. The dough is ready when it’s soft and almost feels bouncy. Drizzle the olive oil into a large bowl, coating the sides of the bowl as well. Lay the dough into the bowl, turning it a few times to cover all the dough with olive oil. Cover, and allow to rise in a warm place for about an hour. I put the covered bowl into my oven, and then preheat the oven to 170. The minute it reaches 170, I turn it off. Don’t forget to turn it off – I did that once and it kind of weirdly cooked the dough. Oops!

Lightly grease a 9×9 casserole dish. Remove the dough from the oven, uncover it, and punch the dough down a few times to pop any air bubbles that may have formed. Turn the dough onto a floured surface, and dust the top of the dough with a little flour too. Roll the dough out into a rectangle, about 12 inches by 15 inches. Remember that it doesn’t have to be perfect, just as close to a rectangle as you can get. Add extra flour to the work surface as needed to the dough doesn’t stick!

Spread the pesto evenly over the dough, and then top with both the shredded mozzarella and parmesan. Carefully roll the dough, with the longer side facing you. Cut the log into 12 even pieces using a serrated and/or sharp knife, and lay each piece into the 9×9 casserole.

Cover the casserole dish with plastic wrap or foil again, and place into the oven. Again, I like to then preheat the oven to 170, and turn it off immediately when it reaches temperature. Allow to rise for about 45-60 minutes, or until the rolls are roughly doubled in size.

Uncover the bread, leaving it in the oven, and preheat the oven to 375 f. Bake about 30-35 minutes, or until the tops off the rolls are just beginning to brown, and the centers don’t look doughy anymore. Remove from the oven, and allow to cool about 15 minutes. Enjoy!

http://www.thiscelebratedlife.com/search/label/recipes

Chocolate Strawberry Cake

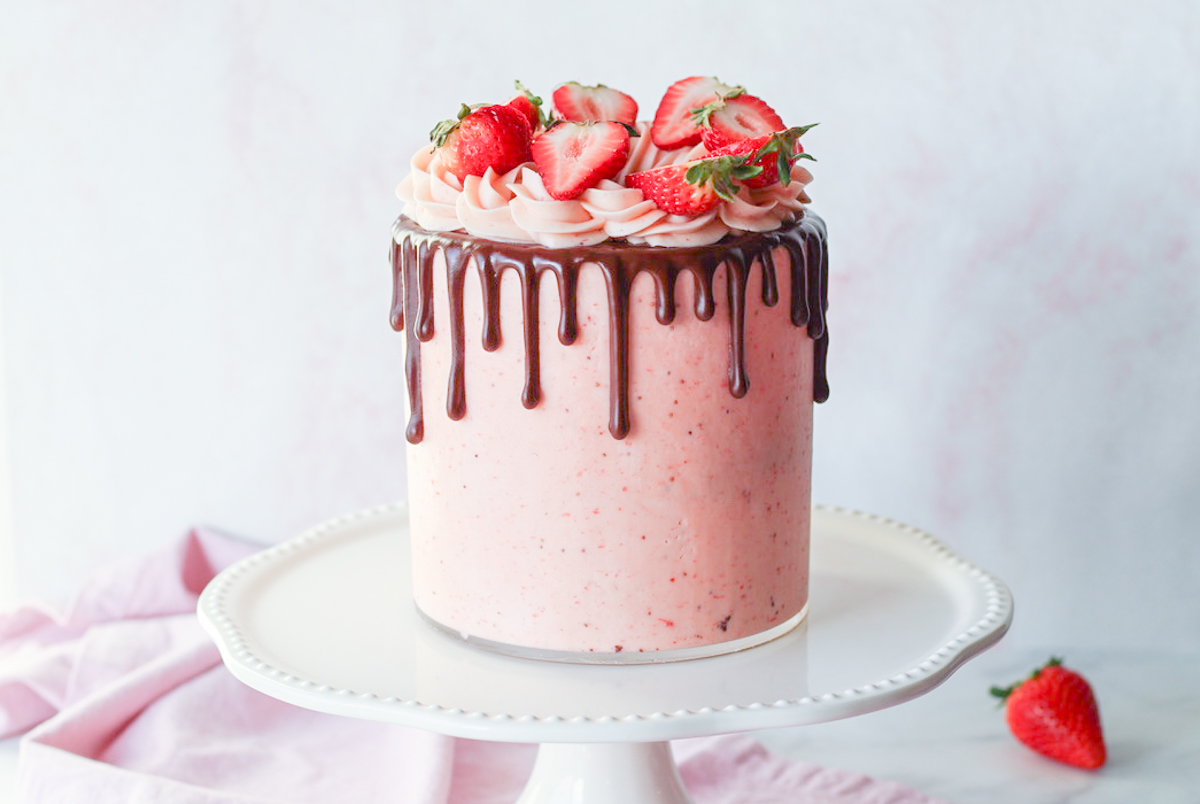
A few days ago I shared my Valentine’s Day wine picks, and today I’m sharing my easy Valentine’s Day dessert idea: Strawberry Chocolate Cake! I don’t know about you, but I’m always ready to try new strawberry dessert recipe ideas. I love the bright, juicy flavor of fresh strawberries, and they pair so well with chocolate. It’s a classic combo for a reason, right?

When I was thinking of this strawberry chocolate cake recipe, I knew that I wanted it to be rich, chocolatey, and fruity. Valentine’s Day chocolate dessert ideas are endless, and I wanted something just a little more special but still a classic dessert. And even though I originally created this recipe for Valentine’s Day, I make it all year round! It’s also a great birthday cake recipe, bridal shower cake idea, and summer cake recipe!

This cake was one of the first recipes on my site, and I recently updated it to include fresh strawberry buttercream instead of extract! It’s lick-the-spatula good, you guys. I also added thinly sliced fresh strawberries between each layer for an extra pop of berry flavor. As one of the most popular cakes here, I know you guys already loved this cake. But holy cow, it just got beyond amazing!

I always feel like fancy Valentine’s Day desserts make the holiday feel even more special, but let’s be honest. Most of us don’t have the time to make super crazy time-intensive desserts. That’s why I love this cake – because like the majority of the recipes you’ll find on my site, this cake looks beautiful and it’s a quick and easy cake recipe too! That’s a perfect Valentine’s Day dessert (or just general dessert) in my opinion!

Chocolate Cake Ingredients:

  • 2 cups all-purpose flour
  • 2 cups granulated sugar
  • 1 cup cocoa powder (I used dark chocolate cocoa powder because I wanted them really intense)
  • 1 tsp salt 1 tsp baking soda
  • 1 cup hot brewed coffee
  • 1 cup unsalted butter (two sticks)
  • 2 eggs, whisked
  • 1/2 cup buttermilk
  • 2 tsp vanilla extract

Fresh Strawberry Buttercream Ingredients:

  • 2 cups unsalted butter, softened to room temperature
  • 5-6 cups powdered sugar
  •  3/4 cup strawberry puree
  • 1 teaspoon vanilla extract
  • salt, to taste 
  • optional garnish: fresh strawberry slices

Dark Chocolate Ganache Ingredients:

  • 1 cup dark chocolate chips
  • 1/4 cup heavy cream

Cake Directions: 

Preheat oven to 350 degrees. Grease and line the bottom of three 6″ round cake pans. Set aside.

In a small pan, heat the butter and coffee until the mixture is steaming and the butter is melted. Take off the burner and let cool. (You can also do this in the microwave.)

Whisk together the dry ingredients, flour through baking soda.

Mix together the eggs, buttermilk and vanilla extract. Add the butter mixture once cooled. If the butter mixture is still too hot when you mix these together, the egg will cook.

Add the dry ingredients into the now combined wet ingredients in two batches. Fold together until just combined. Pour batter into prepared cake pans and bake at 350 for 25-30 minutes – until a toothpick comes out with moist crumbs. Allow the cake to cool in the pans for 10 minutes, then turn them upside down on a cooling rack to cool completely. This will help create a flat top for each layer.

Strawberry Buttercream and Dark Chocolate Ganache Directions: 

In your food processor or blender, blend about 10-12 large de-stemmed strawberries until smooth. (Seeds are ok.) Set aside.

Whip the butter until light and fluffy. Add the powdered sugar one cup at a time, and then add the fresh strawberry puree. Beat on low speed, scraping the sides as necessary. The frosting will look piecy at this point, and that’s ok, it will all come together. Then beat on high speed for about 3-4 minutes, or until all the strawberry is incorporated, and the frosting is light and fluffy.

Ganache and Assembly: melt the chocolate chips and heavy cream together in a small bowl. Spread the strawberry buttercream between each cake layer, and place thinly sliced strawberries between each layer too, if desired. Once the cake layers are assembled, frost the outside of the cake with the buttercream, and drip the chocolate ganache over top. I recommend letting the frosted cake sit in the fridge for about 30 minutes before adding ganache, so it’s cold. Garnish with more fresh strawberries, and serve!

I hope you enjoy!  If you’re looking for more desserts that’s just as easy and delicious, try my Strawberry Champagne Cupcakes or Simple and Delicious Vanilla Cupcakes!

http://www.thiscelebratedlife.com/search/label/recipes

Lemon Blueberry Muffins

I love a good, easy, blueberry muffin. There’s nothing more classic, is there? These muffins are so easy – you don’t even need any equipment other than a bowl, spatula and muffin tin. I love these for when we have company in town, because they’re so quick and easy to whip up, but we enjoy them on any weekend (or weekday) morning!


Flavors In Lemon Blueberry Muffins:

I love how the lemon juice and lemon zest really help to brighten the flavors in these muffins. Classic blueberry muffins are good as is, but lemon and blueberry are such natural compliments, I couldn’t resist! You’ll also notice that these muffins call for cardamom. If you haven’t used cardamom before, it’s a relative to cinnamon, but a little bit lighter. I love it with citrus flavors, and it’s delicious with the blueberries as well! Check out my other cardamom recipes here!


How To Make Buttermilk Substitute For Lemon Blueberry Muffins:

I swear my secret to moist and delicious baked goods is using buttermilk and sour cream! You’ll notice that they’re in most of my recipes, because they’re just so dang good! But I know not everyone keep buttermilk on hand, and sometimes it’s just not worth an extra trip to the store!

Buttermilk is really easy to make at home, all you need is milk and an acid (lemon juice or distilled white vinegar!). Here’s what I do: measure a tablespoon of the acid into a liquid measuring cup. Then top with your milk until it just reaches the 1 cup line (so you’ll have just under a cup of milk in there). Stir together, and let sit for 5 minutes. That’s it!

Print
clock clock iconcutlery cutlery iconflag flag iconfolder folder iconinstagram instagram iconpinterest pinterest iconfacebook facebook iconprint print iconsquares squares iconheart heart iconheart solid heart solid icon

Lemon Blueberry Muffins

5 Stars 4 Stars 3 Stars 2 Stars 1 Star No reviews
  • Author: Kirsten Bell
  • Prep Time: 10 Minutes
  • Cook Time: 18 Minutes
  • Total Time: 28 minutes
  • Yield: 12 Muffins 1x
  • Category: Dessert
  • Method: Baking

Description

Easy, quick and delicious lemon blueberry muffins! Perfect for weekend mornings!


Ingredients

Scale

2 cups all-purpose flour
1/2 teaspoon baking powder
1/2 teaspoon salt
1/2 teaspoon cardamon
1/2 cup sour cream or plain yogurt
1/4 cup buttermilk
3/4 cup granulated sugar
1/4 lemon juice
zest of one lemon
2 eggs
1 teaspoon vanilla
1/2 cup butter, softened
1 1/2 cup blueberries


Instructions

Preheat the oven to 350 degrees, and grease or line a muffin tin. In a medium bowl, whisk together the dry ingredients, flour through cardamom. In another bowl or the bowl of your stand mixer fitted with the paddle attachment, combine the sour cream through butter, mixing until fully combined. Add the dry ingredients, and mix until just combined. Gently stir in the blueberries. Bake 16-20 minutes, or until a toothpick comes out with moist crumbs. Enjoy!


Strawberry Champagne Cupcakes

Valentine’s Day may still be a month away, but it’s never too early to start planning your Valentine’s Day desserts! Enter easy strawberry champagne cupcakes! This is a delicious champagne cupcake, made with actual champagne and a champagne extract for a little extra flair. Then topped with delicious strawberry buttercream, because champagne is always better with strawberries, right? And yes, these are as awesome as they sound!

strawberry champagne cupcakes
 

This Celebrated Life