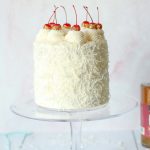
Boozy Pina Colada Cake

If you love Pina Coladas (and getting caught in the rain), then I have the perfect cake for you today! A delicious, boozy Pina Colada cake. Moist layers of coconut cake with homemade bourbon pineapple curd between, and topped with bourbon coconut buttercream frosting. I mean, seriously. This cake is like a tropical cruise in a cake, and I am here for it!


boozy pina colada cake recipe


Ok so you may be thinking – aren’t Pina Coladas usually made with rum? Yes, yes they are! But it turns out that Brown Sugar Bourbon Pina Coladas are just as delicious (possibly even more so!). I took one for the team and did a taste test, and might make all my Pina Coladas with this Brown Sugar Bourbon from now on!


boozy pina colada cake


If you’ve made any of my other cake recipes, you know that I’m not a fan of sickly sweet cakes. In the past I’ve tried coconut cakes that had way too much sugar for my taste, so I was on a mission to create a Pina Colada cake recipe with all the flavor, and less sugar. And the cherry on the top (see what I did there haha!) is the delicious Brown Sugar Bourbon (BSB) in both the pineapple curd and frosting. It’s sooooo good, and I love that hint of flavor throughout the whole cake!


boozy pina colada cake

Can we just take a minute to appreciate these gold sparkly cherries? I’m a tiny bit obsessed! The glitter is obviously optional, but suuuuper easy to add for an extra special decoration. And not just for decoration, since it’s edible! All of my assembly tips for this boozy pina colada cake are included in the notes section of the recipe below!


boozy pina colada cake


Quick Boozy Pina Colada Recipe Notes:

*You’ll notice that the cake calls for coconut milk. By this I mean the canned kind that you’ll most likely find in the Asian food section of your grocery store. (I used the brand Thai Kitchen.) When you open the can, you’ll see thick coconut cream on top – that’s the part you want to use since it has the most fat. One can should have enough for this recipe!

**The pineapple curd calls for pineapple juice – and this will need to be the canned version too. I found this in the juice section of my grocery store. For some reason only the canned version works – because of how bottled juice is normally preserved, from what I understand. If you use “normal” pineapple juice, (as in from a plastic bottle) the curd won’t thicken correctly.


How Do You Make Pina Colada Cake From Scratch?

  • Let’s start with the coconut cake! This is a really easy and simple cake, with coconut flavor from coconut yogurt, coconut extract, and coconut flakes. We cream together our butter and our sugar, add in the remaining wet ingredients, and then add the dry ingredients. Pretty simple, right? And soooo delicious!
  • Next up: Our pineapple curd! Curds are so easy to make on the stove, and have really incredible flavor. As in: your friends will be convinced you’re a culinary genius. Which you are, obviously! To make the pineapple curd, we just combine all the ingredients except the butter in a saucepan and let it thicken, adding the butter at the very end. The eggs do all the thickening for us! You can make this ahead of time, and store it in the fridge until you want to assemble your cake.
  • Finally, coconut buttercream! I feel like I’m transported to a tropical place when I get a whiff of this frosting, which is honestly the goal! The key to a fluffy buttercream frosting is whipping it on high speed in the stand mixer (or with your hand mixer) for a few minutes to get lots of air into it!


Print
clock clock iconcutlery cutlery iconflag flag iconfolder folder iconinstagram instagram iconpinterest pinterest iconfacebook facebook iconprint print iconsquares squares iconheart heart iconheart solid heart solid icon

Boozy Pina Colada Cake

5 Stars 4 Stars 3 Stars 2 Stars 1 Star No reviews
  • Author: Kirsten Bell
  • Prep Time: 15 Minutes
  • Cook Time: 30 Minutes
  • Total Time: 45 minutes
  • Yield: 16 Slices 1x
  • Category: Cakes
  • Method: Baking

Description

A tropical cruise in a cake! This pina colada cake is fun, fruity and delicious!


Ingredients

Scale

Coconut Cake Ingredients:

2 cups all-purpose flour
2 teaspoons baking powder
1/2 teaspoon baking soda
1/2 teaspoon salt
1 cup butter, softened
1 3/4 cups granulated sugar
3 eggs
1 teaspoon vanilla extract
2 teaspoons coconut extract
1/2 cup coconut full-fat yogurt
1/3 cup coconut milk*
1 cup unsweetened coconut flakes

BSB Pineapple Curd Ingredients:

1/2 cup pineapple juice (from a can)**
1/3 cup granulated sugar
2 tablespoons cornstarch
4 egg yolks
1 tablespoon Brown Sugar Bourbon
Small pinch of salt
3 tablespoons butter

BSB Coconut Buttercream Ingredients:

2 cups butter, softened
6 cups powdered sugar
1 tablespoon Brown Sugar Bourbon
2 teaspoons coconut extract
Maraschino cherries with stems for garnish (optional)


Instructions

Coconut Cake Directions: 

Preheat the oven to 350 degrees F. Grease three 6″ cake pans, and line the bottom of each pan with parchment paper. In a medium mixing bowl, combine the dry ingredients, flour through salt. Set aside.

In a stand mixer fitted with the paddle attachment, beat the butter and sugar together until light and fluffy. Add the eggs one by one, followed by the extracts, yogurt, and coconut milk. Mix until all the wet ingredients are incorporated, scraping down the sides of the bowl as necessary.

Add the dry ingredients, mixing on the lowest speed until just combined. Stir in the coconut flakes, making sure to scrape down the sides again as the coconut likes to stick.

Distribute the batter evenly between the prepared cake pans (I like to use this scale to be sure each layer is exactly the same). Bake for 25-30 minutes, or until a toothpick comes out with moist crumbs.

Pineapple Curd Directions: 

Combine all the ingredients except the butter in a medium saucepan over medium heat. Whisk constantly, until the mixture is thick enough to coat the back of a wooden spoon. Remove from heat, and stir in the butter a tablespoon at a time. The pineapple curd will continue to thicken as it cools.

Note the assembly directions below for tips on how to add the pineapple curd between each cake layer.

Bourbon Coconut Buttercream

In the bowl of your stand mixer fitted with the paddle attachment, beat the butter until light and fluffy. Add the powdered sugar one cup at a time. Add the Brown Sugar Bourbon and coconut extract. Beat on high speed for about 5 minutes.


Notes

I prefer to frost cold cakes – I find it easier and there are fewer crumbs. I wrap each cake layer in plastic wrap once they’ve come to room temp, and then let them sit in the fridge for at least a few hours so they’re cold when I’m ready to frost

To assemble with the pineapple curd between each layer of cake, frost an even layer of the buttercream on top of the first layer. Then pipe a border of frosting around the edge of the cake layer. Spoon the pineapple curd into the well that you just created. Repeat with the next layer, and then continue with your crumb coat. (And by the way, I’m posting a video to Instagram in a few days that will show exactly how to do this! Find me @thiscelebratedlife on Instagram to see it!

A crumb coat, if you haven’t heard of it before, is a thin layer of frosting to just seal in the crumbs before you fully frost the cake.

Once your cake is fully frosted, coat it in unsweetened coconut flakes (or sweetened if you prefer).

Top with cherries for a true Pina Colada look! If you want to create the same glitter look that I did here, lightly dry each Maraschino cherry, and then dip them in this edible gold glitter. Easy as that!

Looking For More Cake Recipes?

Tools Used In This Recipe:

Thank you to Heritage Distilling Co. for sponsoring this post. As always, all opinion are my own.

5 Ingredient Mini Crustless Quiche

Mornings in our house are always crazy! Everyone is going different directions, and breakfast becomes crazy too! That’s why I love easy, make-ahead breakfasts that are healthy and full of protein to keep us going. These 5-ingredient mini crustless quiche are perfect for mornings on-the-go, easy lunches and healthy dinners!

 mini crustless quiche

The Perfect Summer Dessert: No Bake Oreo Cheesecake

We love summertime! Lazy days on the lake, hikes through the forest, and iced cocktails on the patio. Hot days are also the perfect time to give the oven a rest, and make an easy no-bake dessert! And these no-bake oreo cheesecake bars are perfect! Quick, easy and delicious for when I don’t want to handle the heat.

Used In This Post: 


You’ll notice in the ingredients that I used Organic Valley cream cheese and heavy cream. I am a big believer that the ingredients we use have a huge impact on the final product. It makes sense, doesn’t it? Of course we’re going to taste the ingredients that we put in our food. That’s kind of the whole point! I love that not only are Organic Valley products organic (obviously), but they also taste so rich and creamy. Totally necessary for cheesecake in my opinion!


Making this no-bake oreo cheesecake is seriously so quick and simple, and I love that it doesn’t require any specialty equipment – just a hand mixer, baking dish and you’re set!

3 Easy Steps To Make No-Bake Oreo Cheesecake:

  • Make the crust! Combine crushed oreos and butter, and press it into the bottom of your pan
  • Make the filling! Beat heavy cream until soft peaks form, and set aside. Combine the rest of the filling ingredients, and then gently fold in the whipping cream. You’ll want to use totally softened cream cheese for easy mixing and a creamy filling. Spoon onto the crust, cover and chill either in the freezer or fridge, depending on your timeline!
  • Prepare the ganache if you want to – this is totally optional but it’s pretty and a little extra chocolate never hurt anyone, right haha?!


Print
clock clock iconcutlery cutlery iconflag flag iconfolder folder iconinstagram instagram iconpinterest pinterest iconfacebook facebook iconprint print iconsquares squares iconheart heart iconheart solid heart solid icon

The Perfect Summer Dessert: No Bake Oreo Cheesecake

5 Stars 4 Stars 3 Stars 2 Stars 1 Star No reviews
  • Author: Kirsten Bell

Description

A quick and easy no-bake dessert recipe – perfect for hot summer days!


Ingredients

Crust Ingredients: 

1 1/4 cups crushed Oreo cookies (cream removed). I crushed mine in my Vitamix, but you could also crush them with a rolling pin. 

1/3 cup Organic Valley salted butter, melted


Filling Ingredients: 


1 1/4 cup Organic Valley heavy cream

16 oz softened Organic Valley cream cheese

1/2 cup powdered sugar

1/2 teaspoon lemon juice

1 teaspoon vanilla

12 Oreo cookies (with cream), roughly chopped 


Ganache Ingredients: 

1 cup semi-sweet chocolate chips
1/3 cup Organic Valley heavy cream


Instructions

Line an 8×8 or 9×9 baking dish with parchment paper so that there’s an overhang on the sides. This will make taking the bars out of the pan much easier. Combine the crushed oreos and the melted butter, and press the mixture evenly into the bottom of the baking dish. Move into the fridge while you prepare the filling. 
 
For the filling: beat the heavy cream with a hand mixer until light and fluffy. Set aside. In a large mixing bowl, beat together the cream cheese, sugar, lemon juice and vanilla until fluffy and well combined. Gently fold the whipped cream into the cream cheese mixture with a spatula until evenly distributed. Stir in the chopped oreos. 
 
Cover the oreo crust with the oreo cheesecake filling. Cover with plastic wrap, and freeze 2-3 hours, or refrigerate 4-6 hours or overnight. 
 

For the ganache: Combine the chocolate chips and the heavy cream in a microwave-safe bowl. Microwave for about 30 seconds, and stir until the chocolate chips are fully melted. Drizzle the somewhat cooled ganache over the cheesecake bars.
Cut and enjoy!


Looking for some more summertime desserts? Check these out: 

Equipment Used In This Recipe:

The 3 Secrets To Make Beautiful And Delicious Charcuterie Boards

For this week’s post, I joined forces with charcuterie extraordinaire and Pullman, WA local Audrey, from A La Board NW. She specializes in charcuterie and cheese boards for catering local events. I was so excited to sit down with her, learn her top tips for creating charcuterie boards at home, and nibble on some of these delicious goodies.

Charcuterie boards offer many options, satisfy a number of cravings, and also cater to dietary restrictions. Since every guest gets to choose what they eat, charcuterie boards are great for anyone with gluten-free, vegetarian, and low carb diets! They’re perfect for casual girls nights or elegant Thanksgiving dinners, and the smallest of celebrations to the greatest of gatherings. While they’re packed with complex flavors and look beautiful, they are very simple to assemble – especially when you know these 3 secrets!

As much content as this guide has, it really is as simple as pulling cheeses, meats, crackers, and produce out of your fridge and cupboards, throwing it on a cutting board, and arranging it to please the mind’s eye. The best boards are made from curiosity and creativity – plus a little wine to help you get there!

Secret #1: What To Buy

The good news is, cheese and cured meats go with almost everything! But below are some general guidelines for cheese, meats, sides and starches. 
Cheese: When it comes to cheese, some things to consider are what type of animals’ milk is used, where the cheese is made, the smell, the texture, and even the color. Some people love goat cheese, while others prefer sharper/drier cows milk cheeses. An overall good rule of thumb is to grab a few wedges of everything – that way everyone has something they like! For example, my favorite cheeses to grab for charcuterie boards are: cheddar, brie and goats cheese. Even though I don’t personally love goat cheese, a lot of people do, and I’m happy with the cheddar and brie. 
Meat: Most cured meats are made from pork: salame, prosciuto, coppa, soprassata, Serrano ham, etc. They are all packed with flavor and texture, and are enjoyed by many meat eaters. Things to consider when purchasing are spice level, cost, and how easy they are to prepare. Coppa and prosciutto can be a little more expensive, but are a delicious treat. If you prefer salame and soprassatta, grab a few different types for variety. 
Fruits and Vegetables: When choosing sides such as fruits and vegetables, consider what might pair well with your cheeses, meats and drinks you’re serving. Most charcuterie boards will have fruits like grapes, berries, cherrise, apples, pears, figs, peaches, cantaloupe, apricots, plums, etc. These fruits provide a lot of color and flavor, and can be prepared in bite-sized pieces. The best vegetables to accompany charcuterie boards are usually picked – they taste amazing paired with meats and cheese! Picked asparagus, green beans, olives, artichokes and cornichons (baby pickles), are all great options. 
Bread and Crackers: Neutral crackers and slices of baguette are perfect to accompany all the flavor in your meats and cheeses. Triscuits or Carrs Water Crackers are great options, and my personal favorite is toasted baguette! Neutral crackers pair with pretty much everything, and you can add flavor with the spreads below! If you really like flavored crackers, aim for rosemary or garlic! For toasted baguettte (my favorite), slice the baguette in 1/3 inch sections, lightly dust with olive oil, and sprinkle with salt. Bake at 375 for 15 minutes, and voila!

Spreads: One of my favorite ways to add extra interest and excitement in charcuterie boards is to serve it with spreads! Spreads that I often use are mustards, jams, and honey. Mustards add spice, zest, mild sweetness, and a light bitterness that kicks your bite up a notch. Jams pair really well with softer cheeses and fatty meats.

Secret #2: How Much To Buy

This can be a tricky one, when you’re standing in the grocery store staring at the cheese selection. Do I need 3 or 4 wedges? Is that too little? What if I have a ton leftover?

Well, here’s a little trick-of-the-trade formula so you never have to second guess again! First, figure out how many people you’re serving. Typically serving sizes for meats, cheeses and starches are around 1 ounce, and the normal serving size for fruits and vegetables is 2-3 ounces.

What does this mean? Let’s say you’re expecting 10 guests. You will need total:

  • 10 ounces of each cheese
  • 10 ounces of each meat
  • 20-30 ounces of fruit
  • 20-30 ounces of vegetables 
  • 10 ounces of crackers or bread 

Some people will enjoy more, and some will enjoy less, and this formula accounts for that. Pretty easy, right? 

Secret #3: How To Assemble Charcuterie Boards 

You’ve chosen all your items, you have the perfect amount of each, and now it’s time to assemble your board!

You’ll notice that the prettiest charcuterie boards focus on variation in textures and colors. For example, bright red cherries alongside a wedge of creamy brie make both foods stand out and instantly look more appetizing.

Start by laying out your starches, taking up about 1/3 of the board. Add your cheeses in separate spots of the board, and place your meats in between. Then fill in any empty spots with fruit, nuts, extra crackers – whatever looks good to you! Nestle small containers of mustards and jams in between. (For these boards, we used shot glasses for the condiments. They’re the perfect size, and inexpensive!)

Remember to have fun with your charcuterie boards! Mix up your flavors each time and experiment with what you like best! 
If you’re local and are interested in more information on charcuterie board catering options, you can email Audrey here, and be sure to follow her on Instagram to stay up to date on where she’s serving next!

One Bowl Peanut Butter Blondies

I love quick and easy desserts, and as someone who always dreads doing the dishes, I especially love one bowl desserts! These peanut butter blondies are so delicious, full of creamy peanut butter and melted chocolate. And just dirtying one bowl? Added bonus!

Used In This Recipe: 


easy peanut butter blondies

This Celebrated Life